Recessed lighting has become a defining feature of modern interiors, offering a clean, elegant look while providing practical illumination. If you’ve ever wondered how to install recessed lighting, you’re not alone. Homeowners often choose this lighting style to brighten kitchens, living rooms, hallways, and offices without cluttering the ceiling. While the finished result looks simple, proper planning and installation are essential for safety and performance. This guide is designed to walk you through the entire process in a clear, structured way. Whether you’re upgrading existing fixtures or starting from scratch, you’ll gain confidence, clarity, and practical knowledge before picking up a single tool.
Understanding Recessed Lighting and How It Works
Recessed lighting, how to install recessed lighting, often called can lights or downlights, is installed directly into the ceiling so the fixture sits flush with the surface. The light housing is hidden above the ceiling, leaving only the trim visible. This design creates a streamlined appearance while distributing light evenly across the room. Recessed fixtures typically include three main components: the housing, the trim, and the bulb. Each part plays a critical role in performance and safety. Understanding these basics before learning how to install recessed lighting helps you choose the right fixtures and avoid mistakes that could affect brightness, insulation clearance, or long-term reliability.
Benefits of Installing Recessed Lighting in Your Home
How to install recessed lighting, One of the biggest advantages of recessed lighting is its ability to enhance both functionality and aesthetics. These fixtures make rooms appear larger by eliminating hanging lights and visual clutter. They work well for task lighting, accent lighting, and general illumination. Recessed lights are also highly versatile, fitting into nearly any room style from traditional to contemporary. With modern LED options, they are energy-efficient and long-lasting. Another benefit is flexibility in placement, allowing you to highlight artwork, countertops, or architectural features. These advantages explain why many homeowners choose to learn how to install recessed lighting instead of relying on surface-mounted fixtures.
Planning Your Recessed Lighting Layout Carefully
Before any cutting or wiring begins, careful planning is essential. How to install recessed lighting, Start by identifying the purpose of the lighting in each room. Task-focused areas like kitchens require more evenly spaced fixtures, while living rooms may benefit from layered lighting. Measure ceiling height, room size, and furniture placement to determine ideal spacing. A common guideline is placing lights 4 to 6 feet apart, depending on ceiling height. Also consider joist locations, existing wiring, and HVAC ducts. Thoughtful planning reduces installation challenges and ensures balanced illumination. This step is often overlooked, yet it has the greatest impact on how successful your recessed lighting project will be.
Choosing the Right Type of Recessed Lighting Fixtures
How to install recessed lighting, Selecting the correct fixture type is just as important as learning how to install recessed lighting. There are new construction housings, designed for open ceilings, and remodel housings, made for finished ceilings. Insulation Contact (IC-rated) housings are required when fixtures touch insulation, while non-IC housings need clearance to prevent overheating. LED integrated fixtures are increasingly popular due to energy efficiency and minimal heat output. Trim styles also vary, including baffle, reflector, and adjustable options. Each choice affects light output, safety, and appearance. Matching the fixture type to your ceiling structure and lighting goals ensures a professional-quality result.
Tools and Materials You Will Need
How to install recessed lighting, Having the right tools ready makes installation smoother and safer. Basic tools include a stud finder, tape measure, drywall saw, wire stripper, and voltage tester. You’ll also need electrical cables, junction boxes if required, wire connectors, and the recessed lighting kits themselves. Personal safety equipment such as gloves and eye protection is highly recommended. Using quality materials reduces the risk of electrical issues later. Organizing everything before starting prevents interruptions and mistakes. Proper preparation may not feel exciting, but it plays a major role in ensuring the installation process stays efficient and stress-free from beginning to end.
Safety Precautions Before Starting the Installation
How to install recessed lighting, Electrical work always carries risk, so safety must come first. Turn off power at the main circuit breaker before touching any wiring. Use a voltage tester to confirm the power is completely off. Never rely solely on wall switches for safety. If you’re working near insulation, ensure your fixtures are properly rated to avoid fire hazards. Working slowly and deliberately helps prevent accidents. If local codes require permits or inspections, follow them carefully. These precautions protect both your home and yourself. Understanding safety fundamentals is an essential part of learning how to install recessed lighting responsibly and confidently.
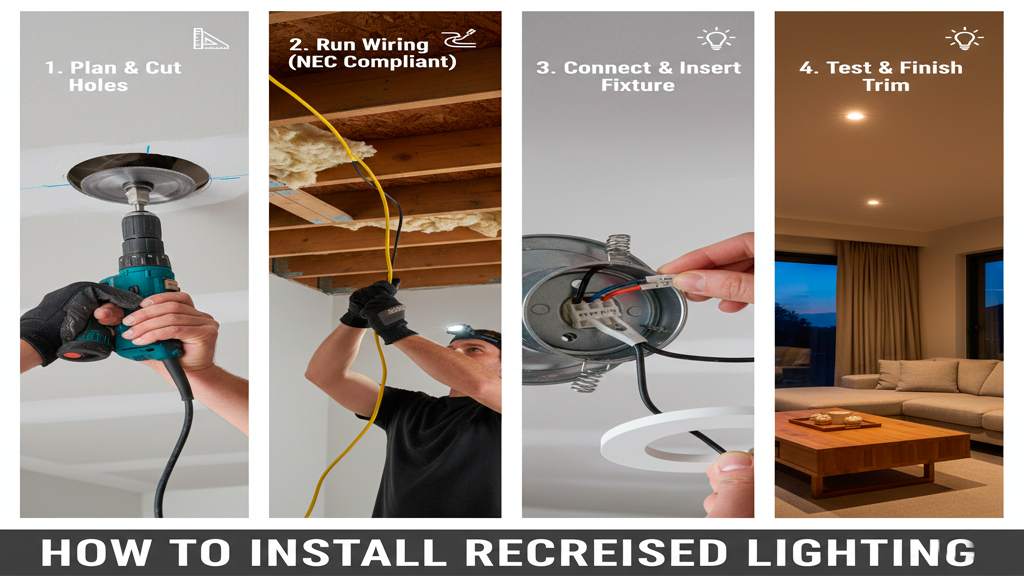
Marking and Cutting Ceiling Openings Accurately
How to install recessed lighting, Once planning and safety checks are complete, the next step is marking the ceiling. Use the fixture’s template or trace the housing outline to ensure precise cuts. Double-check spacing and alignment before cutting. A stud finder helps avoid ceiling joists and hidden obstacles. Cut slowly with a drywall saw to maintain clean edges. Mistakes at this stage can lead to uneven fixtures or costly repairs. Accuracy here ensures the housings fit securely and look professional. Taking extra time to measure and mark carefully pays off by preventing alignment issues that could compromise the final appearance of your recessed lighting.
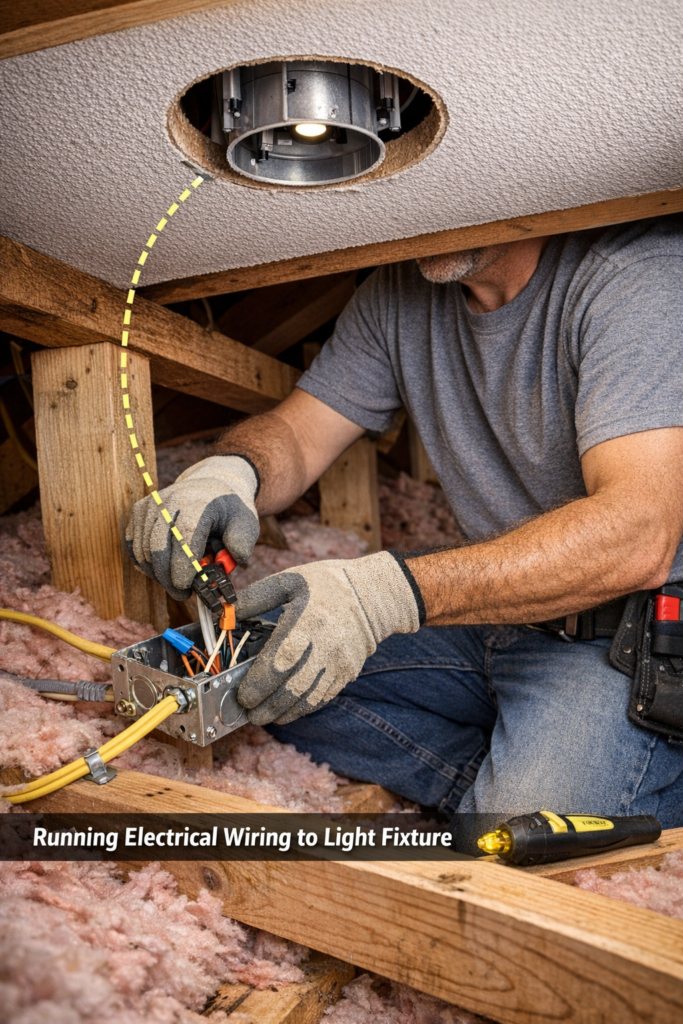
Running Electrical Wiring to Each Fixture Location
With ceiling holes prepared, wiring can begin. How to install recessed lighting, Run electrical cable from the power source to each recessed light location, following a daisy-chain configuration if allowed by code. Secure cables properly and avoid sharp bends that could damage insulation. Each housing has a junction box where wires are connected using approved connectors. Ensure connections are tight and neatly arranged. This step requires patience and attention to detail, as poor wiring can cause flickering or power failures. Properly routed wiring ensures reliable performance and compliance with electrical standards, forming the backbone of a successful recessed lighting installation.
Installing the Recessed Lighting Housing
After wiring, How to install recessed lighting, the housing is secured into the ceiling opening. Remodel housings typically use clips that clamp onto the drywall, while new construction housings attach directly to joists. Make sure each housing sits flush with the ceiling surface. Improper placement can result in uneven trim later. Double-check that wiring connections are enclosed within the junction box and that covers are secured. This stage transforms your project from preparation to visible progress. Correctly installed housings provide the structural foundation for your lights and ensure they remain stable and safe for years to come.
Connecting Switches and Power Sources
How to install recessed lighting, Connecting the recessed lights to a wall switch allows convenient control. If replacing an existing switch, carefully match wires by color and function. When adding a new switch, additional wiring may be required, which can increase complexity. Dimmers are a popular option for recessed lighting, offering adjustable brightness and improved ambiance. Ensure dimmers are compatible with LED fixtures if used. Secure all connections and mount the switch firmly in its box. Proper switch installation enhances usability and energy efficiency, completing the electrical control side of the recessed lighting system.
Installing Bulbs and Attaching the Trim
How to install recessed lighting, Once housings are secure and wiring is complete, install the bulbs and trim. LED bulbs or integrated LED modules are recommended for efficiency and longevity. Attach the trim according to manufacturer instructions, usually by snapping or spring-loading it into place. Ensure the trim sits evenly against the ceiling without gaps. This step brings the project to life, revealing the clean, modern look recessed lighting is known for. Attention to detail here enhances the final appearance and ensures consistent light distribution throughout the room.
Testing the System and Restoring Power
Before celebrating, restore power at the breaker and test each light. Turn switches on and off to confirm proper operation. Check for flickering, buzzing, or uneven brightness. If issues appear, turn power off and inspect wiring connections. Testing ensures safety and functionality before regular use. This final check provides peace of mind that everything was installed correctly. A properly tested system not only performs better but also reduces the risk of future electrical problems, marking a successful conclusion to the installation process.
Common Mistakes to Avoid During Installation
Many issues arise from rushing or skipping steps. Common mistakes include incorrect spacing, cutting into joists, using non-IC-rated fixtures near insulation, and loose wiring connections. Another frequent error is choosing overly bright bulbs, which can create harsh lighting. Avoiding these mistakes requires patience, planning, and attention to instructions. Learning from common pitfalls helps you achieve a polished result without unnecessary rework. Awareness of these errors is just as valuable as knowing how to install recessed lighting itself.
Cost Considerations and Time Expectations
The cost of installing recessed lighting varies depending on fixture type, room size, and whether existing wiring is available. DIY installations typically cost less, primarily covering materials. Time-wise, a single room can take 4 to 8 hours, depending on experience. While professional installation costs more, it saves time and ensures code compliance. Understanding these factors helps set realistic expectations and budget accordingly. Whether you choose DIY or professional help, knowing the process empowers you to make informed decisions.
When to Call a Professional Electrician
While many homeowners successfully handle this project, some situations call for professional help. Complex wiring, panel upgrades, or unfamiliar electrical layouts increase risk. If local codes are strict or inspections are required, a licensed electrician ensures compliance. There’s no shame in seeking expert assistance when safety or confidence is at stake. Knowing your limits is part of responsible home improvement. Sometimes, understanding how to install recessed lighting also means knowing when not to do it alone.
Conclusion: Bringing Light and Style Together
Learning how to install recessed lighting is a rewarding journey that combines technical skill with creative design. From planning and safety to wiring and finishing touches, each step contributes to a polished, modern result. While the process requires patience and precision, the payoff is a beautifully lit space that feels open, functional, and stylish. Whether you complete the project yourself or work with a professional, understanding each stage gives you control and confidence. Recessed lighting is more than an upgrade—it’s an investment in comfort, efficiency, and timeless design.
Frequently Asked Questions
1. Is it difficult to install recessed lighting?
The difficulty depends on your electrical experience. Basic installations are manageable with planning and safety awareness.
2. Can recessed lighting be installed in any ceiling?
Most ceilings are suitable, but joist placement and insulation type may affect fixture selection.
3. How many recessed lights do I need per room?
This depends on room size and purpose, but spacing lights 4 to 6 feet apart is a common guideline.
4. Are LED recessed lights better than traditional bulbs?
Yes, LED lights are more energy-efficient, last longer, and produce less heat.
5. Do recessed lights increase home value?
Properly installed recessed lighting can enhance aesthetics and appeal, potentially increasing value.
6. Can I add a dimmer to recessed lighting?
Yes, dimmers are commonly used, but ensure compatibility with your bulbs.
7. How long does recessed lighting installation take?
Most projects take one full day for an average room, depending on complexity.
For More Update and Stories Visit Daily Guides