
Learning how to draw a rhino is both an exciting artistic challenge and a rewarding creative experience. Rhinoceroses are among the most powerful and ancient-looking animals on Earth. Their massive bodies, thick skin folds, and iconic horn make them visually striking subjects for artists. At first glance, sketching such a large and muscular creature may feel intimidating. However, when broken down into simple shapes and guided steps, the process becomes approachable for beginners and enjoyable for experienced artists alike.
In this detailed guide, you will discover practical drawing techniques, anatomical insights, shading strategies, and creative tips. By understanding how to draw a rhino structure and proportion, you will be able to confidently create realistic or stylized rhino illustrations with depth and personality.
Understanding the Anatomy Before You Start
Before putting pencil to paper, it helps to understand how to draw a rhino the animal’s basic structure. Rhinos are large mammals with barrel-shaped bodies, short sturdy legs, thick necks, and one or two prominent horns depending on the species. The most well-known species include the White Rhinoceros, Black Rhinoceros, and Indian Rhinoceros, each with slightly different physical features.
A rhino’s body resembles a heavy oval, while the head is elongated with a sloping forehead. The horn grows from the nasal bone area and curves slightly upward. Observing these details allows you to capture accurate proportions. Studying reference images helps you notice subtle features such as skin folds around the shoulders and legs, which give the animal its rugged appearance.
Essential Drawing Tools for Success
You do not need expensive art supplies to master how to draw a rhino. A standard HB pencil is perfect for initial sketching because it allows light guidelines and easy corrections. A softer 2B or 4B pencil can be used later for shading and darker outlines. A good eraser is important for refining details without damaging the paper.
If you prefer digital art, a drawing tablet with pressure sensitivity helps achieve smooth shading transitions. However, traditional sketching builds strong foundational skills. Start simple and focus on understanding how to draw a rhino structure rather than worrying about advanced materials. Consistency in practice matters more than equipment.
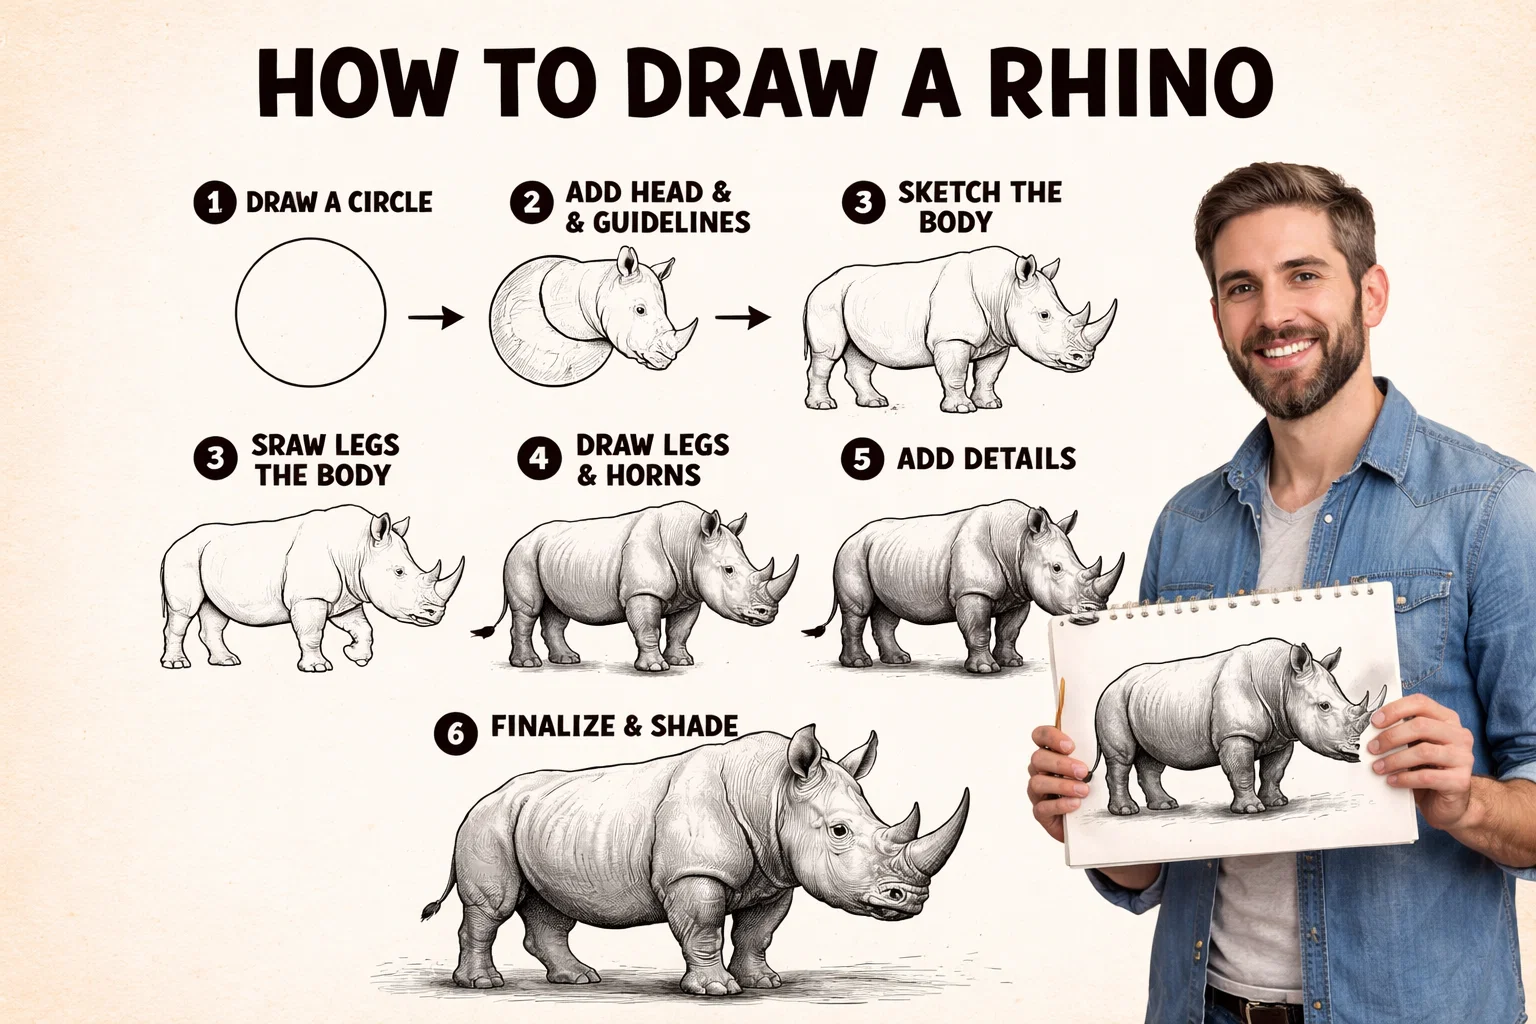
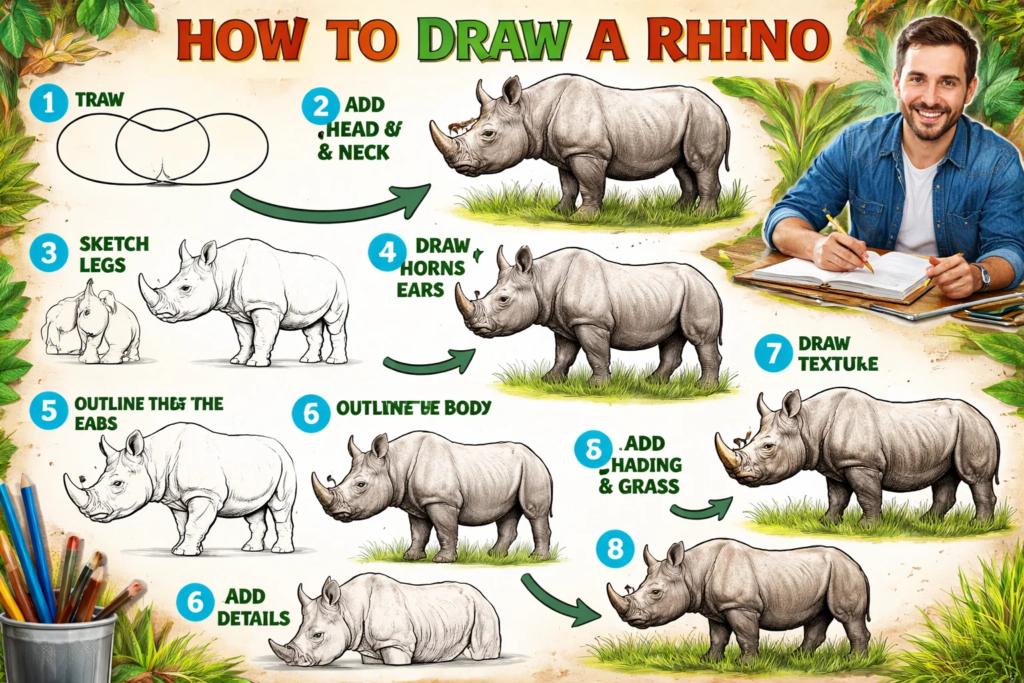
Step 1: Sketching the Basic Body Shape
How to draw a rhino? Begin with light, simple shapes. Draw a large horizontal oval for the body. This shape forms the core mass of the animal. Next, add a smaller oval slightly overlapping at the front to represent the chest area. These two shapes create the rhino’s heavy torso.
Keep your lines light and flexible. At this stage, perfection is not required. The goal is to establish balance and proportion. Make sure the body appears solid and grounded rather than narrow or stretched. These initial shapes serve as a framework that will guide all later details.
Step 2: Adding the Head and Neck
To continue learning how to draw a rhino, attach a smaller elongated oval at the front of the body for the head. Connect the head to the torso using two slightly curved lines to form the thick neck. Rhinos have powerful neck muscles, so avoid making this area too thin.
Position the head slightly lower than the body’s top line to create a natural posture. Pay attention to the angle. A slight downward tilt gives the rhino a realistic grazing stance. Proper alignment between the head and torso ensures the drawing looks stable and lifelike.
Step 3: Drawing the Legs and Feet
Rhinos have short, sturdy legs that support their massive weight. Sketch four cylindrical shapes extending from the underside of the body. The front legs are usually straight, while the back legs have a slight bend at the knee joint.
At the bottom of each leg, draw rounded feet with three visible toes. Avoid sharp angles; instead, use smooth curves to maintain the animal’s heavy yet balanced look. Ensure the legs align properly beneath the body to prevent the drawing from appearing off-balance. Good leg placement adds realism and structural integrity.
Step 4: Shaping the Iconic Horn
The horn is one of the defining features of this magnificent animal. Depending on the species, a rhino may have one or two horns. The front horn is typically larger and more curved. Draw it emerging from the top of the snout, tapering toward a slightly pointed tip.
Keep the horn slightly curved rather than perfectly straight. Add subtle texture lines to show its natural roughness. When mastering how to draw a rhino, remember that the horn should appear solid and integrated into the head rather than floating separately. Its placement influences the entire facial structure.
Step 5: Refining Facial Features
Now add the eyes, ears, nostrils, and mouth. Rhino eyes are relatively small compared to their large heads. Place them slightly above the midline of the head oval. Draw a small almond shape and add a tiny highlight to create life.
The ears are pointed and positioned on top of the head. They often tilt outward slightly. Draw two triangular shapes with gentle curves rather than sharp points. Add a small curved line for the mouth and oval nostrils near the tip of the snout. Keep these details subtle to maintain realism.
Step 6: Adding Skin Folds and Texture
One of the most distinctive features of rhinos is their thick, folded skin. Add curved lines around the shoulders, neck, and upper legs to represent natural wrinkles. These folds give the animal depth and character.
Avoid overdoing the lines. Instead, place them strategically where skin naturally bends. Around the legs and neck are ideal spots. When shading later, these folds will create shadowed areas that enhance realism. Texture is what transforms a simple outline into a convincing animal illustration.
Step 7: Inking and Cleaning the Sketch
How to draw a rhino? Once satisfied with your pencil sketch, carefully refine the final lines. Use a darker pencil or fine liner to trace over the clean outlines. Maintain steady strokes and avoid pressing too hard at first. Smooth, confident lines make a significant difference in presentation.
After inking, gently erase the construction lines underneath. This step reveals a clean and polished drawing. Proper line work highlights structure and gives your rhino a professional finish.
Step 8: Shading for Depth and Realism
How to draw a rhino? Shading brings your drawing to life. Identify a light source before starting. Areas opposite the light should appear darker, such as under the belly, beneath the head, and between the legs. Use soft pencil strokes to build gradual shadows.
Blend lightly using tissue or blending tools for smoother transitions. Emphasize deeper folds with darker shading to enhance texture. The horn should have subtle highlights to show its curved form. Careful shading transforms a flat sketch into a three-dimensional figure.
Creating a Cartoon Rhino Style
How to draw a rhino? If realism feels challenging, try a cartoon version. Simplify the shapes further and exaggerate features like large eyes or a smaller body. Rounded edges and minimal shading create a friendly, childlike appearance.
Cartoon rhinos work well for children’s books or animation projects. Keep the horn short and less sharp to make the character appear approachable. This variation shows how flexible artistic interpretation can be.
Common Mistakes to Avoid
How to draw a rhino? One common mistake is drawing the body too narrow. Remember that rhinos are massive animals. Another frequent issue is placing the legs unevenly, causing imbalance. Always check alignment before finalizing.
Over-detailing too early can also lead to messy sketches. Build gradually from simple shapes to complex features. Patience and layering are essential for strong results.
Practicing with Different Poses
After mastering the standing pose, experiment with movement. Draw a walking rhino by adjusting leg positions slightly forward and backward. For a grazing pose, lower the head further toward the ground.
Practicing varied angles improves your understanding how to draw a rhino of anatomy and proportion. The more perspectives you explore, the more confident your skills will become.
Why Rhinos Make Fascinating Art Subjects
How to draw a rhino? Rhinos symbolize strength, resilience, and ancient heritage. Fossil records show their lineage dates back millions of years. Today, species such as the White Rhinoceros face conservation challenges due to poaching and habitat loss.
Drawing wildlife can deepen appreciation for nature and inspire awareness. When you learn how to draw a rhino, you are not just creating art—you are capturing the spirit of a powerful and endangered animal.
Conclusion
Mastering how to draw a rhino becomes much easier when you break the process into manageable steps. Start with simple shapes, refine structure carefully, and add texture thoughtfully. Focus on proportions, horn placement, and skin folds to achieve realism. Whether you choose a realistic or cartoon style, patience and practice are key.
How to draw a rhino? Each drawing improves your observation skills and artistic confidence. With consistent effort, you can create impressive wildlife illustrations that showcase both technical ability and creative expression. Keep practicing, experiment with new poses, and enjoy the journey of artistic growth.
Frequently Asked Questions
1. Is drawing a rhino difficult for beginners?
Not if you start with simple shapes. Breaking the body into ovals and cylinders makes the process manageable and beginner-friendly.
2. How do I make the horn look realistic?
Add gentle curves and subtle texture lines. Shading along one side creates depth and dimension.
3. What pencil is best for shading?
A 2B or 4B pencil works well for smooth, darker shading, while HB pencils are ideal for sketching guidelines.
4. How can I improve proportions?
Study reference images and compare head-to-body ratios carefully. Practicing basic animal anatomy helps significantly.
5. Should I draw skin wrinkles everywhere?
No. Focus on natural fold areas such as the neck and shoulders. Too many lines can make the drawing look cluttered.
6. Can I draw a rhino digitally?
Yes. Digital tools offer layering and blending options, but mastering traditional sketching strengthens core skills.
For More Update and Stories Visit Daily Guides