Iron-on patches have become one of the most popular ways to personalize clothing, repair damaged fabric, and add creative flair to everyday items. From denim jackets and backpacks to uniforms and hats, patches allow you to express identity while extending the life of your garments. Many people want to learn how to iron on patches properly because incorrect application can lead to peeling, uneven adhesion, or permanent fabric damage. Fortunately, the process is simple when you follow the right steps and use proper tools. Understanding heat, pressure, and placement ensures a professional finish. With the right preparation and techniques, your patch can stay firmly attached for years without loosening or fading.
Understanding Iron-On Patches and How They Work
Iron-on patches use a special heat-activated adhesive backing, typically made from thermoplastic glue. When heat is applied, this adhesive melts and bonds with the fibers of the fabric. As it cools, it solidifies, creating a strong and durable attachment. This process is called heat bonding, and it works best on fabrics that can tolerate high temperatures. Cotton, denim, and polyester blends are ideal materials because they absorb heat evenly. However, delicate fabrics like silk or nylon may not handle heat well. Knowing your fabric type ensures proper bonding. Understanding how to iron on patches and how the adhesive works helps prevent common mistakes and ensures a reliable and long-lasting result.
Why Iron-On Patches Are So Popular Today
Iron-on patches are widely used because they offer convenience, affordability, and creative flexibility. Instead of sewing, which requires skill and time, heat application completes the process quickly. Many fashion brands use patches to create unique designs and repair damaged areas without replacing entire garments. Patches also serve practical purposes in uniforms, sports teams, and military gear by displaying logos or ranks. The durability and versatility of heat-activated patches make them suitable for everyday use. Their growing popularity reflects modern trends in customization, sustainability, and personal expression. Learning how to iron on patches proper application ensures you can take advantage of these benefits confidently.
Tools and Materials Needed Before You Begin
Before applying any patch, gathering the correct tools ensures success and prevents mistakes. The most important tool is a standard household iron capable of producing consistent heat. Steam should be turned off because moisture interferes with adhesive bonding. You also need a heat-resistant surface, such as an ironing board or flat table covered with thick fabric. A thin cotton cloth or pressing cloth protects the patch and garment from direct heat exposure. Clean fabric is essential because dirt and oils weaken adhesion. how to iron on patches Proper preparation ensures even heat distribution and secure bonding. Using the right tools creates a professional-quality result and prevents future patch detachment.
Choosing the Right Fabric for Best Adhesion
Fabric selection plays a critical role in patch durability. Natural fibers like cotton and denim provide excellent adhesion because their texture allows adhesive penetration. Polyester blends also work well because they tolerate moderate heat. However, fabrics like nylon, silk, leather, or waterproof materials may resist bonding or become damaged under heat. Always check garment labels for heat tolerance before application. Rough or textured surfaces may require extra pressure to ensure proper bonding. Understanding how to iron on patches fabric compatibility helps prevent peeling or weak attachment. Proper fabric selection ensures your patch remains securely attached and maintains its appearance over time.
How to Prepare Your Garment Before Applying the Patch
Preparation is essential for strong and permanent adhesion. How to iron on patches? Start by washing and drying the garment to remove dirt, oils, and manufacturing residues. Even new clothing may contain chemicals that interfere with bonding. Iron the garment first to remove wrinkles and create a flat surface. Wrinkles can prevent even adhesive contact and weaken the bond. Place the garment on a stable, heat-resistant surface. Position the patch carefully and check alignment before applying heat. Preparation ensures uniform contact between adhesive and fabric. Proper garment preparation improves bonding strength and prevents uneven attachment or future peeling.
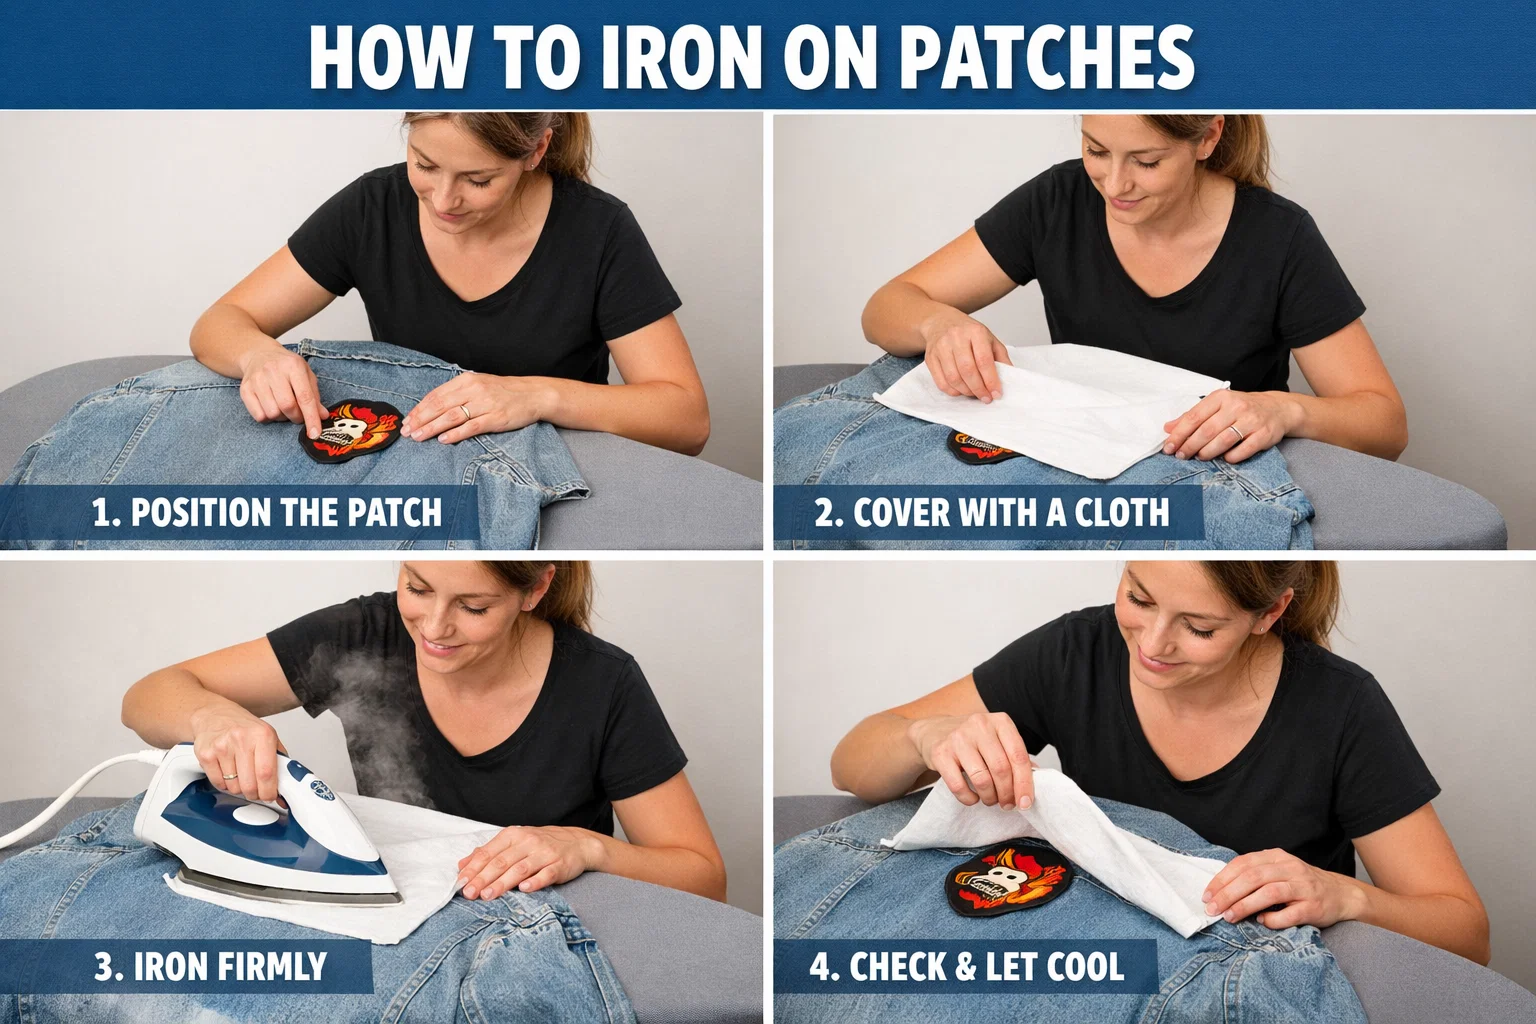
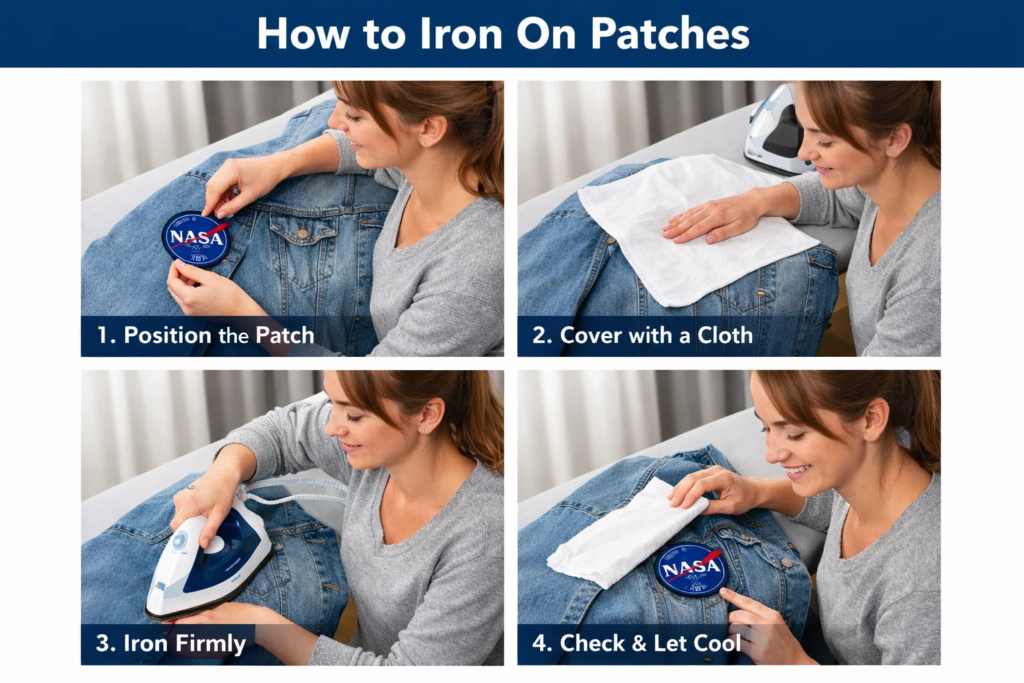
How to Iron on Patches Step by Step for Perfect Results
Learning how to iron on patches correctly involves a series of simple but important steps. First, set your iron to the appropriate heat setting, usually medium to high heat without steam. Allow the iron to heat completely. Place the patch adhesive-side down on the desired location. Cover it with a thin cotton cloth to protect the patch and garment. Press the iron firmly on top of the patch for 20–30 seconds without moving it. Apply consistent pressure to ensure even bonding. Lift the iron carefully and allow the patch to cool completely. Cooling allows the adhesive to solidify and create a strong bond.
Applying Proper Heat and Pressure for Strong Bonding
Heat and pressure work together to activate adhesive bonding. Too little heat prevents proper melting, while excessive heat can damage fabric or patch design. Always follow recommended temperature guidelines. How to iron on patches apply firm, steady pressure to ensure adhesive spreads evenly into the fabric fibers. Avoid moving the iron during application because movement can shift the patch and weaken bonding. After pressing the front, turn the garment inside out and apply heat to the back for additional strength. This ensures deeper adhesive penetration. Proper heat and pressure create a secure and durable attachment that withstands repeated washing and wear.
Cooling Time and Why It Matters
Cooling is an essential but often overlooked step. After applying heat, the adhesive remains soft and vulnerable. Allow the patch to cool completely for several minutes before touching or moving the garment. Cooling allows adhesive molecules to solidify and bond firmly with the fabric. Moving the patch too early can break this bond and cause peeling. Cooling also helps prevent fabric distortion or patch misalignment. Patience during cooling ensures long-lasting adhesion. Proper cooling strengthens the attachment and improves durability. This step ensures how to iron on patches professional results and prevents future patch detachment.
How to Ensure Long-Lasting Patch Durability
Durability depends on proper application and ongoing care. After bonding, avoid washing the garment for at least 24 hours. This allows the adhesive to fully stabilize. When washing, use cold or warm water instead of hot water. Excessive heat can weaken adhesive bonds over time. Turning garments inside out during washing reduces friction and protects the patch. Air drying is recommended because high dryer heat may loosen adhesive. Proper care ensures patches remain attached and retain their appearance. Following these practices how to iron on patches extends patch lifespan and maintains garment quality.
Common Mistakes to Avoid When Applying Iron-On Patches
Many people make mistakes that weaken adhesion. Using steam prevents adhesive from bonding properly. Applying insufficient heat or pressure results in weak attachment. Placing patches on dirty or wrinkled fabric reduces bonding effectiveness. Moving the iron during application causes uneven bonding. Skipping cooling time weakens adhesive strength. Applying patches to unsuitable fabrics may cause damage or detachment. Avoiding these mistakes ensures proper bonding and durability. Careful application prevents frustration and ensures long-lasting results. Understanding how to iron on patches these errors helps improve success rates and ensures professional-quality application.
How to Fix a Patch That Won’t Stick Properly
How to iron on patches? If a patch begins to peel, it can often be fixed with reheating. Place the patch in position and repeat the heating process with proper pressure. Cover the patch with a cloth and apply heat again. Turning the garment inside out and applying heat from the back improves bonding strength. If reheating fails, fabric glue or sewing can reinforce attachment. Fixing patches early prevents complete detachment. Proper repair techniques restore durability and ensure continued use. Timely correction prevents further damage and maintains garment appearance.
Alternative Methods for Securing Patches
While heat bonding is convenient, sewing provides the strongest and most permanent attachment. Sewing reinforces patch edges and prevents peeling. Fabric glue offers another option for delicate fabrics that cannot tolerate heat. How to iron on patches? Some people combine ironing and sewing for maximum durability. Each method has advantages depending on fabric type and usage. Choosing the right method ensures optimal results. Combining methods provides extra security and extends patch lifespan. Understanding alternatives ensures flexibility and improves patch durability.
Best Types of Patches for Iron Application
High-quality patches with thick adhesive backing provide the best results. How to iron on patches? Embroidered patches and woven patches work well because they tolerate heat and pressure. Thin or low-quality patches may not bond effectively. Always check patch instructions before application. Quality patches provide stronger adhesion and longer lifespan. Investing in good patches ensures reliable performance and durability. High-quality materials improve bonding and maintain appearance over time.
Creative Ways to Use Iron-On Patches
Iron-on patches allow endless creative possibilities. You can customize jackets, jeans, backpacks, hats, and uniforms. Patches can repair torn areas while adding decorative elements. They also allow personalization of clothing with logos, names, or artistic designs. Creative patch placement enhances style and individuality. How to iron on patches customization allows self-expression and extends garment life. Using patches creatively transforms ordinary clothing into unique fashion statements.
Conclusion
Learning how to iron on patches correctly ensures strong adhesion, durability, and professional-quality results. Proper preparation, heat application, pressure, and cooling are essential for successful bonding. Choosing compatible fabrics and following correct techniques prevents peeling and ensures long-lasting attachment. Iron-on patches provide a convenient and creative way to repair and customize clothing. With proper care and application, patches can remain securely attached for years. Following these steps how to iron on patches ensures reliable and professional results every time.
FAQs
1. How long should I press the iron on the patch?
Press firmly for 20–30 seconds. This allows adhesive to melt and bond properly. Apply consistent pressure without moving the iron.
2. Can I use steam when applying patches?
No, steam prevents proper adhesive bonding. Always use a dry iron setting for best results.
3. Why is my patch peeling after washing?
Peeling occurs due to insufficient heat or pressure. Reapply heat and allow proper cooling to fix the issue.
4. Can iron-on patches be applied to any fabric?
No, delicate fabrics like silk or nylon may not tolerate heat. Cotton and denim work best.
5. How long should I wait before washing after applying a patch?
Wait at least 24 hours to allow adhesive to fully bond and stabilize.
6. Is sewing better than ironing patches?
Sewing provides stronger attachment, but ironing is faster and easier. Combining both offers maximum durability.
7. Can I remove an iron-on patch later?
Yes, reheating adhesive softens it, allowing removal. However, some adhesive residue may remain.
For More Update and Stories Visit Daily Guides