
An undermount sink is more than just a kitchen fixture; it is a design statement that adds elegance, functionality, and long-term value to your home. Many homeowners choose this style for its clean lines, easy countertop cleaning, and modern appearance. However, learning how to install undermount sink systems correctly is critical because improper installation can lead to leaks, cabinet damage, or sink failure over time. Unlike drop-in sinks, undermount sinks rely on strong support, precise sealing, and accurate alignment. This guide explains the entire process in clear, practical language, combining professional insights with easy-to-follow steps so you can confidently achieve a durable, professional-quality result.
What Is an Undermount Sink and Why It Matters
An undermount sink is installed beneath the countertop rather than resting on top of it. How to install undermount sink, This design creates a smooth transition between the counter and sink, making cleaning easier and improving visual appeal. These sinks are commonly paired with granite, quartz, marble, and solid surface countertops, as these materials provide the strength needed for proper support. The absence of a rim on the countertop surface prevents debris buildup and enhances hygiene. Understanding how undermount sinks function helps homeowners appreciate why precision during installation is essential. Every detail, from support brackets to sealant choice, contributes to long-term performance.
Benefits of Choosing an Undermount Sink
Undermount sinks offer several practical and aesthetic advantages. One of the biggest benefits is easy countertop cleanup, as crumbs and water can be wiped directly into the sink. How to install undermount sink, They also provide a sleek, high-end appearance that enhances modern kitchen designs. From a functional standpoint, undermount sinks often allow for slightly more usable bowl space compared to top-mount styles. When installed properly, they are extremely durable and stable. These benefits explain why many homeowners are eager to learn how to install undermount sink systems correctly rather than relying solely on contractors.
Understanding Undermount Sink Compatibility
How to install undermount sink, Before installation begins, compatibility must be confirmed. Undermount sinks are not suitable for all countertop materials. Laminate countertops typically lack the structural strength and exposed edges required. Stone and solid surfaces work best because they can support the sink’s weight and create a clean finished edge. Cabinet construction also matters. The base cabinet must be strong enough to hold the sink, water, and garbage disposal if installed. Verifying compatibility early prevents costly mistakes and ensures the installation process proceeds smoothly without structural concerns.
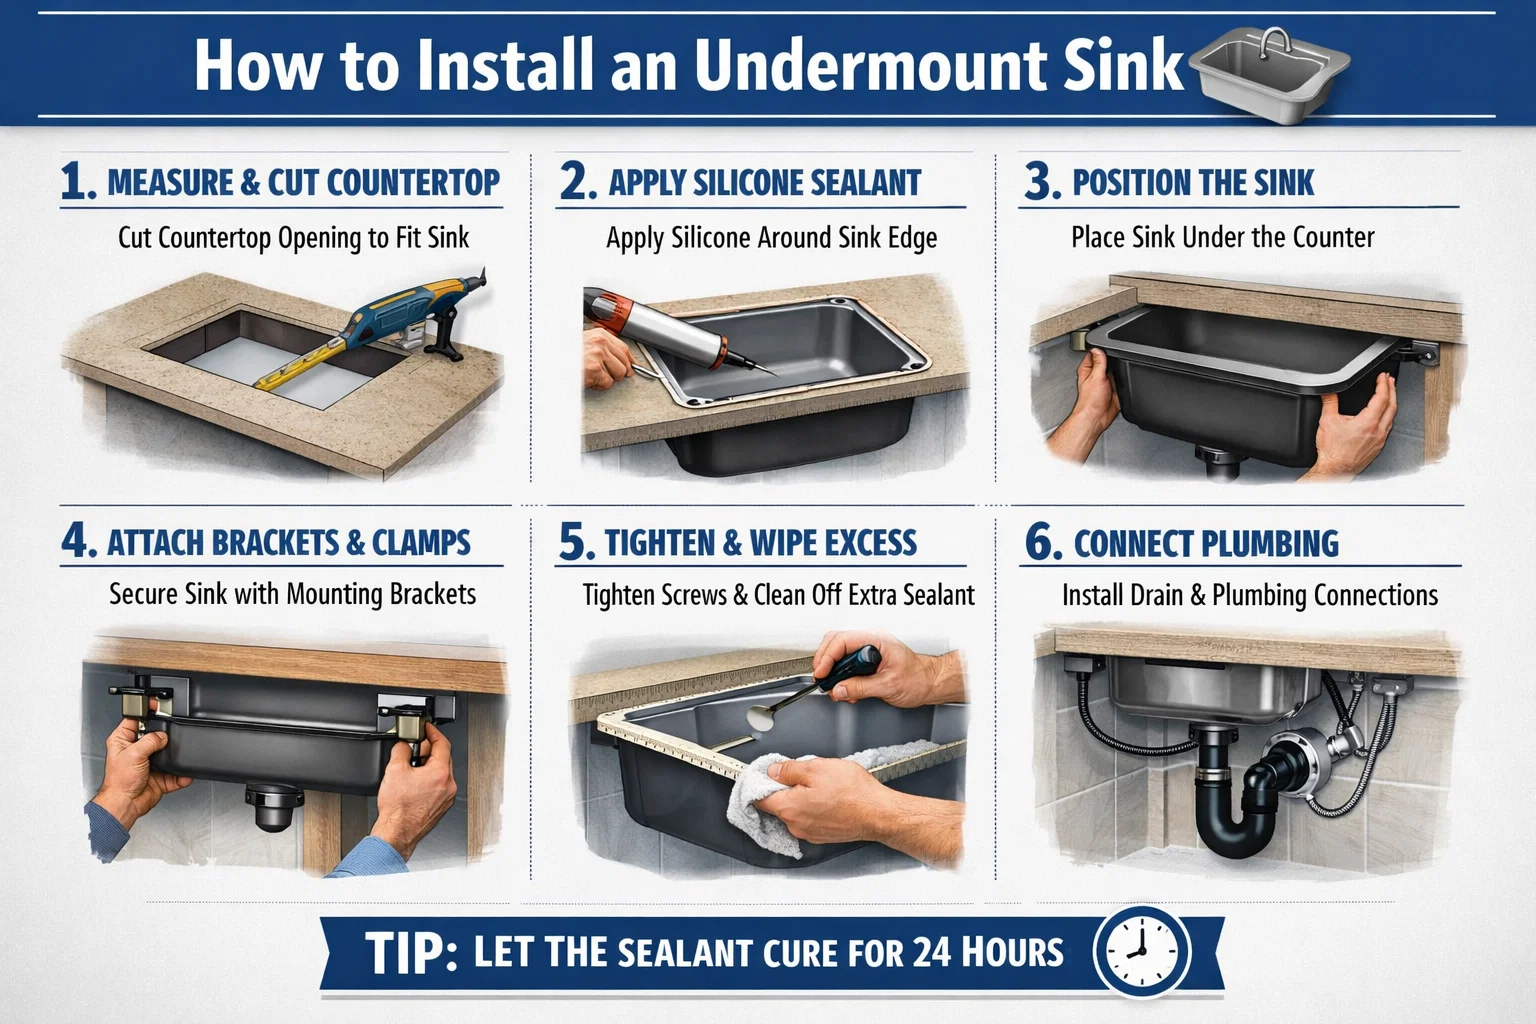
Planning Before You Install an Undermount Sink
How to install undermount sink, Proper planning is the foundation of a successful installation. Begin by measuring the sink opening, cabinet interior, and plumbing clearances. Decide whether you want a positive reveal, zero reveal, or negative reveal, as this affects how much of the sink edge is visible. Planning also includes choosing the correct sink size and depth based on daily usage. Allocate enough time for curing sealants and adhesives, as rushing this step can compromise durability. A clear plan reduces stress, avoids errors, and ensures that every component aligns correctly during installation.
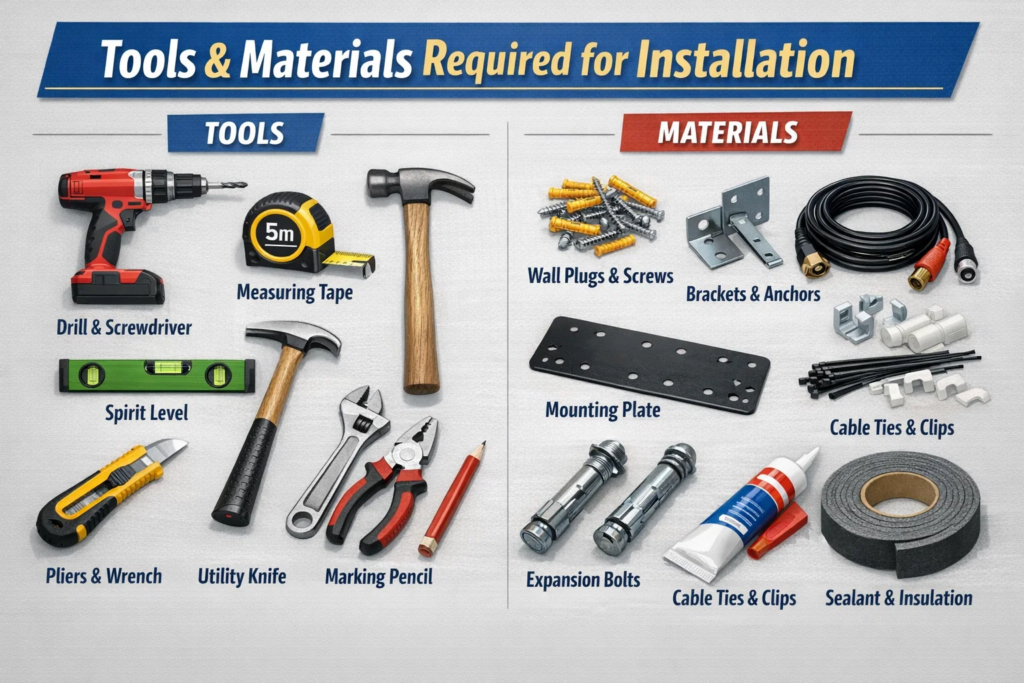
Tools and Materials Required for Installation
How to install undermount sink, Installing an undermount sink requires specific tools and materials to ensure stability and safety. Common tools include a drill, adjustable wrench, clamps, level, and measuring tape. Essential materials include high-strength epoxy or silicone sealant, mounting clips, support brackets, and threaded rods if required. Using manufacturer-approved hardware is critical for load-bearing performance. High-quality sealants prevent leaks and protect cabinetry from moisture damage. Preparing all tools and materials in advance keeps the workflow efficient and minimizes interruptions during critical stages of the installation.
Removing an Existing Sink Safely
If you are replacing an old sink, removal must be done carefully. How to install undermount sink, Start by shutting off the water supply and disconnecting plumbing lines. Loosen mounting hardware and cut through old sealant using a utility knife. Support the sink from below to prevent sudden drops that could damage cabinets or countertops. Once removed, clean the underside of the countertop thoroughly. Removing residue ensures the new sink seals properly. This step may seem straightforward, but careful execution protects surrounding structures and prepares the surface for a secure undermount installation.
Inspecting and Preparing the Countertop
How to install undermount sink, After removing the old sink, inspect the countertop underside for cracks, chips, or moisture damage. Address any issues before proceeding. Clean the surface with a non-oily cleaner to ensure proper adhesion. Dry-fitting the new sink at this stage helps confirm alignment and reveal style. Preparing the countertop correctly is essential because the sink relies entirely on the bond between the countertop and mounting hardware. A clean, smooth surface ensures sealants and adhesives perform at their best, preventing leaks and long-term failures.
Dry-Fitting the Undermount Sink
How to install undermount sink, Dry-fitting is a critical step often overlooked. Position the sink beneath the countertop cutout without sealant or hardware. Check alignment, centering, and reveal consistency on all sides. Use a level to confirm the sink sits evenly. Adjustments are far easier at this stage than after adhesives are applied. Dry-fitting also confirms that plumbing connections align properly. Taking time here prevents misalignment issues and ensures the final installation looks intentional and professionally executed.
Applying Sealant for a Watertight Bond
Sealant application is one of the most important steps when learning how to install undermount sink systems. Apply a continuous bead of 100% silicone sealant around the underside of the countertop cutout. This seal prevents water from seeping into cabinets and provides an additional bonding layer. Lower the sink carefully into position, pressing firmly to ensure full contact with the sealant. Excess sealant should squeeze out slightly, indicating a proper seal. Clean excess immediately to maintain a neat finish.
Securing the Sink with Mounting Hardware
Once positioned, secure the sink using mounting clips, brackets, or threaded rods as recommended by the manufacturer. Tighten hardware evenly to avoid stress points. For heavy sinks, additional support rails or cradle systems may be required. Ensure the sink remains level during tightening. This step provides the structural strength needed to support daily use, water weight, and accessories like garbage disposals. Proper hardware installation is essential for long-term stability and safety.
Allowing Adhesive and Sealant to Cure
Curing time is critical and should never be rushed. Most sealants and epoxies require 12 to 24 hours to fully cure. During this period, avoid connecting plumbing or placing weight in the sink. Temporary support, such as wooden braces, can hold the sink in place while curing. Allowing proper cure time ensures the bond reaches full strength. Skipping this step often leads to sink detachment or leaks later, making patience a key factor in successful installation.
Installing the Drain and Garbage Disposal
After curing, install the drain assembly using plumber’s putty or gasket as specified. Tighten connections securely and attach the garbage disposal if applicable. Ensure all components align correctly to prevent strain on fittings. Proper drain installation ensures efficient water flow and prevents leaks. Testing the drain before reconnecting water supply helps identify issues early. This step completes the functional plumbing aspect of the project.
Reconnecting Water Supply Lines
Reconnect hot and cold water supply lines to the faucet. Using new flexible supply lines is recommended for reliability. Turn on the water slowly and inspect all connections for leaks. Tighten fittings gently as needed. Proper water line installation ensures consistent pressure and long-term performance. Even small drips should be addressed immediately to protect cabinetry and flooring from water damage.
Final Inspection and Testing
A thorough final inspection confirms installation success. Check sealant lines, mounting hardware, and plumbing connections. Run water for several minutes while observing for leaks or movement. Ensure the sink remains level and stable. Final testing provides peace of mind and ensures the sink is ready for daily use. Attention to detail at this stage confirms the effectiveness of every previous step.
Maintenance Tips for Undermount Sinks
Maintaining an undermount sink is simple but important. Clean sealant edges periodically to prevent mold buildup. Avoid hanging heavy objects from the sink. Inspect mounting hardware annually for signs of loosening. Proper care extends the lifespan of both the sink and countertop. With basic maintenance, undermount sinks remain functional and attractive for many years.
Common Mistakes to Avoid
Common mistakes include skipping dry-fitting, using incorrect sealant, and rushing curing time. Another frequent error is underestimating the weight of the sink and failing to add adequate support. Avoiding these mistakes ensures a secure installation and prevents costly repairs. Awareness of potential pitfalls is just as important as following correct steps.
Conclusion
Learning how to install undermount sink systems empowers homeowners to achieve a sleek, durable, and professional kitchen upgrade. From careful planning and preparation to precise sealing and secure mounting, every step plays a vital role in long-term success. When installed correctly, an undermount sink enhances functionality, improves cleanliness, and elevates kitchen aesthetics. With patience, proper tools, and attention to detail, this project can be completed confidently and successfully.
Frequently Asked Questions
How long does it take to install an undermount sink?
Most installations take 4–6 hours, excluding curing time.
Can undermount sinks be installed on laminate countertops?
No, laminate generally lacks the structural strength required.
What sealant is best for undermount sinks?
100% silicone sealant is recommended for flexibility and waterproofing.
Do undermount sinks need extra support?
Yes, especially heavy sinks; support brackets or rails are essential.
When can I use the sink after installation?
Light use is possible after 24 hours, once sealant has cured.
Is professional installation necessary?
DIY is possible, but precision is crucial for safety and durability.
For More Update and Stories Visit Daily Guides