
Installing a kitchen sink may seem like a complex plumbing task, but with the right guidance, tools, and preparation, it becomes a manageable and rewarding home improvement project. Learning how to install a kitchen sink properly not only saves money on professional labor but also gives homeowners greater control over quality and long-term performance. A well-installed sink improves daily kitchen functionality, prevents leaks, and enhances the overall appearance of the space. Whether you are replacing an old unit or installing a brand-new sink during a renovation, understanding each stage ensures confidence and accuracy. This guide blends practical instructions with real-world insights to help you achieve a secure, durable, and professional result.
Understanding Different Types of Kitchen Sinks
Before beginning installation, it is essential to understand the type of kitchen sink you are working with. Common options include top-mount sinks, undermount sinks, farmhouse sinks, and integrated sinks. Each design has unique installation requirements, mounting methods, and support needs. For example, top-mount sinks rest on the countertop, while undermount sinks attach beneath it for a seamless look. Material choices such as stainless steel, granite composite, cast iron, and fireclay also affect handling and sealing techniques. How to install a kitchen sink Understanding these differences helps you plan the correct installation method and avoid compatibility issues with countertops, cabinets, and plumbing connections.
Benefits of Installing a Kitchen Sink Yourself
How to install a kitchen sink, DIY sink installation offers several advantages beyond cost savings. Homeowners gain firsthand knowledge of their plumbing system, making future maintenance easier. Installing the sink yourself ensures attention to detail, especially when sealing and aligning components. It also allows customization, such as precise faucet placement or drain alignment. Completing the project builds confidence in handling home repairs and upgrades. While professional installation is always an option, many homeowners find that careful preparation and patience lead to excellent results. When done correctly, a DIY installation can match professional quality while providing a sense of accomplishment and control over materials used.
Planning Before You Install a Kitchen Sink
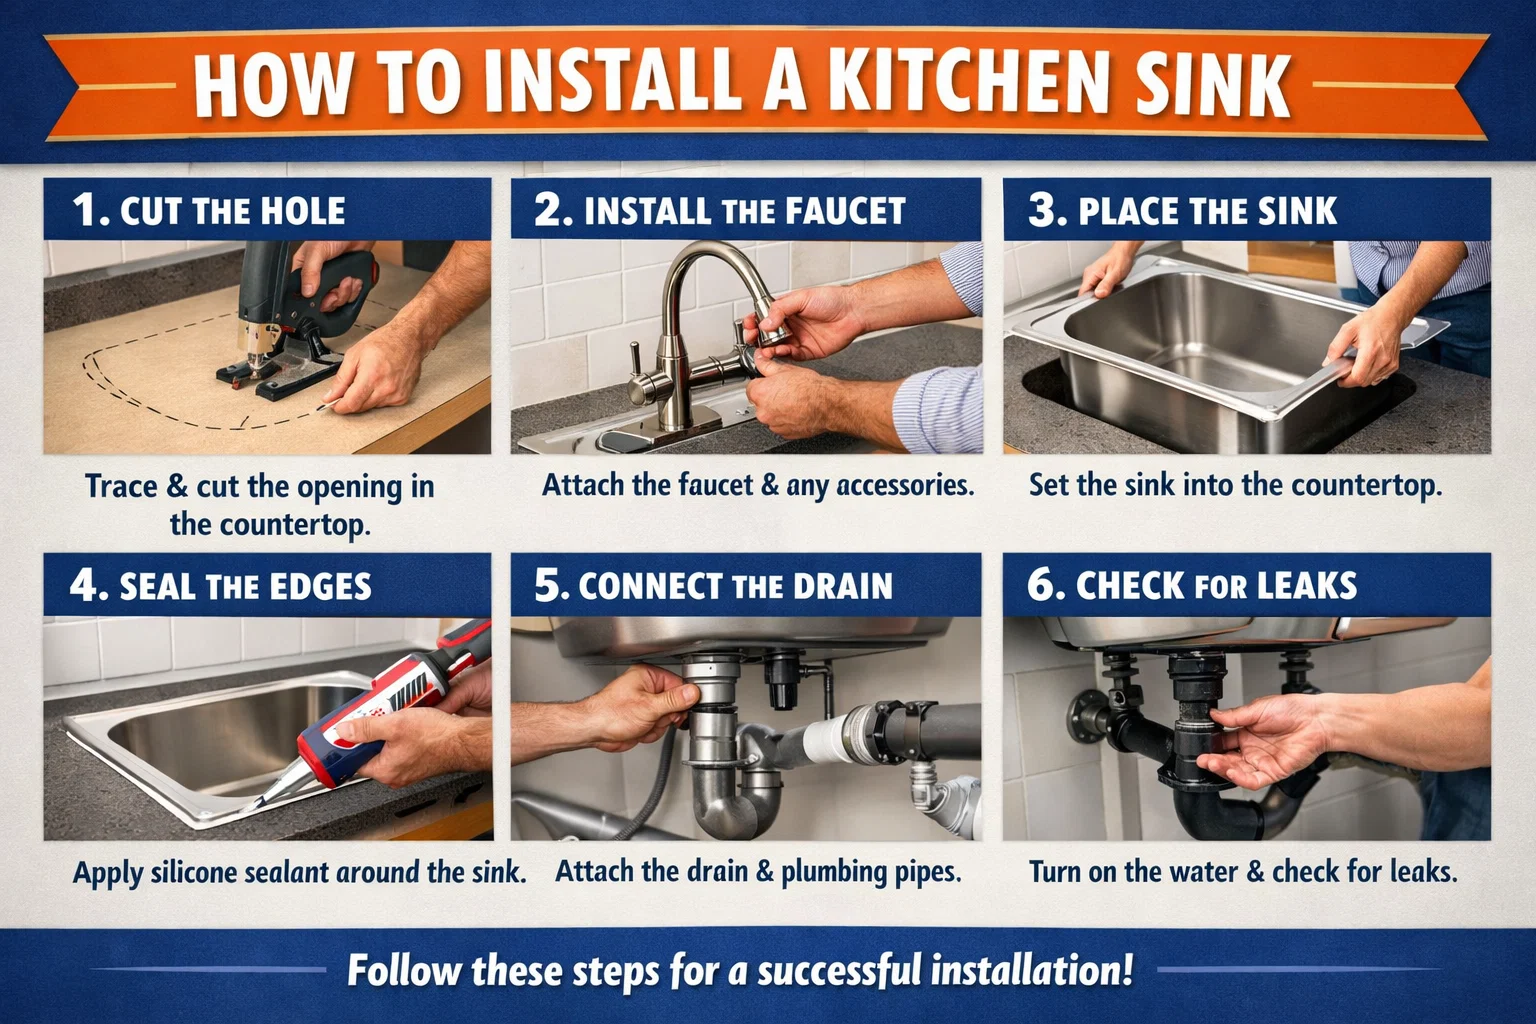
How to install a kitchen sink, Proper planning is the foundation of a successful installation. Begin by measuring the cabinet opening, countertop cutout, and sink dimensions to ensure compatibility. Check plumbing connections, including water supply lines and drain height, to avoid unexpected modifications. Consider faucet placement, accessory holes, and garbage disposal compatibility. Planning also includes scheduling enough time to work without rushing, as precision is critical. By mapping out each step in advance, you reduce the risk of mistakes, leaks, or misalignment. Thoughtful planning saves time, minimizes stress, and ensures the installation process proceeds smoothly from start to finish.
Essential Tools and Materials Required
How to install a kitchen sink, Having the correct tools and materials ready prevents interruptions and errors. Basic tools include an adjustable wrench, basin wrench, screwdriver, utility knife, plumber’s putty, and a level. Materials often include silicone sealant, mounting clips, new supply lines, and a drain assembly. For heavier sinks, additional support brackets may be required. Using high-quality sealants and fittings ensures durability and leak prevention. Organizing tools beforehand keeps the workflow efficient and focused. Preparation is not just about having tools, but also understanding their purpose, which helps avoid damage to fixtures and surrounding cabinetry during installation.

Removing the Old Kitchen Sink Safely
How to install a kitchen sink, If you are replacing an existing sink, careful removal is essential. Start by turning off the water supply and disconnecting supply lines and the drain assembly. Loosen mounting clips beneath the sink and cut through old sealant using a utility knife. Lift the sink gently to avoid damaging the countertop. Cleaning away old adhesive and debris prepares the surface for the new installation. This step is often overlooked but is critical for achieving a proper seal later. Taking time to remove the old sink carefully protects surrounding surfaces and ensures the new sink sits evenly and securely.
Preparing the Countertop and Cabinet Area
How to install a kitchen sink, Once the old sink is removed, inspect the countertop and cabinet area thoroughly. Look for signs of water damage, mold, or weakened support structures. Reinforce cabinets if necessary, especially for heavy materials like cast iron or farmhouse sinks. Clean the surface to remove dust, grease, or old sealant. Dry-fitting the new sink at this stage helps confirm proper sizing and alignment. Preparation ensures the sink will sit flush and seal correctly. A clean, stable surface is essential for preventing future leaks and maintaining the integrity of both the sink and countertop.
Dry-Fitting the New Kitchen Sink
Dry-fitting involves placing the sink into the cutout without sealant or fasteners. How to install a kitchen sink, This step confirms alignment, fit, and accessibility for plumbing connections. Check that faucet holes line up correctly and that the sink sits level. Make adjustments if necessary before final installation. Dry-fitting reduces the risk of last-minute surprises and ensures a smooth final placement. It also allows you to visualize the finished result and confirm that all components work together seamlessly. Skipping this step often leads to misalignment or sealing issues later in the process.
Applying Sealant and Positioning the Sink
How to install a kitchen sink, Applying sealant correctly is crucial for preventing water leaks. Run a continuous bead of silicone sealant around the edge of the countertop cutout. Carefully lower the sink into place, pressing gently to ensure even contact. Excess sealant should squeeze out slightly, indicating a proper seal. Wipe away excess immediately for a clean finish. Positioning the sink accurately at this stage is vital, as adjustments become difficult once mounting clips are secured. Proper sealing protects cabinetry and countertops from moisture damage and extends the life of the installation.
Securing the Sink to the Countertop
How to install a kitchen sink, Once positioned, secure the sink using mounting clips or brackets as recommended by the manufacturer. Tighten evenly to avoid warping or stress on the sink. For undermount sinks, ensure proper support while the adhesive cures. Check alignment with a level before final tightening. Securing the sink firmly prevents movement during daily use and maintains a watertight seal. This step requires patience and attention to detail, as uneven tightening can compromise both appearance and performance. A securely mounted sink forms the foundation for reliable plumbing connections.
Installing the Faucet and Accessories
How to install a kitchen sink, Installing the faucet before reconnecting plumbing often simplifies the process. Attach the faucet according to manufacturer instructions, ensuring gaskets and washers are correctly placed. Install accessories such as soap dispensers or sprayers at this stage. Tighten fittings securely but avoid overtightening, which can damage components. Proper faucet installation ensures smooth operation and prevents leaks. This step also contributes to the overall aesthetic of the kitchen, as alignment and spacing affect visual balance. Taking time here ensures both functionality and style are achieved.
Connecting the Drain Assembly
The drain assembly is a critical component that requires precision. How to install a kitchen sink, Apply plumber’s putty around the drain flange and insert it into the sink opening. Secure it from below with the provided gasket and nut. Connect the drain pipe and, if applicable, the garbage disposal unit. Ensure all connections are tight and aligned properly. Proper drain installation prevents leaks and ensures efficient water flow. Testing the drain before finalizing the installation helps identify issues early, reducing the risk of future plumbing problems.
Reconnecting Water Supply Lines
How to install a kitchen sink, Reconnect hot and cold water supply lines to the faucet using new, flexible connectors if possible. Tighten connections securely and turn the water supply back on slowly. Check for leaks at each connection point. Using new supply lines reduces the risk of failure and ensures optimal performance. This step completes the functional aspect of the installation and requires careful observation. Even small leaks should be addressed immediately to prevent water damage. Properly connected supply lines ensure consistent water flow and long-term reliability.
Testing for Leaks and Final Adjustments
How to install a kitchen sink, Testing is a vital final step. Run water through the faucet and drain, observing all connections for leaks. Check beneath the sink and around the sealant line. Make necessary adjustments and tighten fittings as needed. Allow sealant to cure according to manufacturer recommendations before heavy use. Final adjustments ensure everything functions as intended and meets safety standards. Thorough testing provides peace of mind and confirms the success of the installation.
Maintenance Tips for Long-Term Performance
How to install a kitchen sink, Regular maintenance keeps your sink functioning efficiently. Clean the surface with non-abrasive cleaners to preserve finish. Periodically check seals and connections for wear. Avoid pouring grease or debris down the drain to prevent clogs. Simple care routines extend the life of both the sink and plumbing components. Proper maintenance ensures the time invested in learning how to install a kitchen sink continues to deliver value for years.
Conclusion
Understanding how to install a kitchen sink empowers homeowners to take control of a vital kitchen upgrade. From planning and preparation to final testing, each step contributes to a secure, leak-free, and visually appealing result. With patience, proper tools, and attention to detail, a DIY installation can achieve professional-quality outcomes. This process not only enhances kitchen functionality but also builds confidence in handling future home improvement projects.
Frequently Asked Questions
How long does it take to install a kitchen sink?
Most installations take 2–4 hours, depending on experience and sink type.
Can I reuse old plumbing connections?
It is recommended to use new supply lines and seals for reliability.
Is sealant better than plumber’s putty?
Both are useful; silicone sealant is ideal for edges, while putty suits drains.
Do I need professional help for heavy sinks?
Heavy sinks may require additional support or assistance during installation.
How soon can I use the sink after installation?
Light use is possible immediately, but allow 24 hours for sealant curing.
What is the most common installation mistake?
Improper sealing and uneven mounting are the most frequent issues.
For More Update and Stories Visit Daily Guides