Learning how to install a bathtub drain is an essential skill for homeowners who want to maintain their bathrooms efficiently and avoid costly plumbing repairs. A properly installed drain ensures smooth water flow, prevents leaks, and protects the structural integrity of your bathroom floor. Whether you are upgrading an old drain, fixing a persistent leak, or installing a new bathtub, understanding the process helps you make informed decisions. This guide is written to be practical, detailed, and easy to follow, even for beginners. With the right tools, patience, and attention to detail, installing a bathtub drain can become a manageable DIY project that adds long-term value to your home.
Understanding the Purpose of a Bathtub Drain System
How to install a bathtub drain a bathtub drain system is designed to move water safely from the tub to the home’s plumbing network while preventing leaks and odors. It consists of several interconnected parts, including the drain flange, drain body, waste shoe, overflow pipe, and trap. Each component plays a critical role in ensuring efficient drainage and water sealing. A poorly installed drain can lead to hidden leaks, mold growth, and structural damage over time. Understanding how these components work together helps you recognize why precision matters during installation. When installed correctly, the system operates silently, drains quickly, and maintains a watertight seal even after years of regular use.
Types of Bathtub Drains and Their Differences
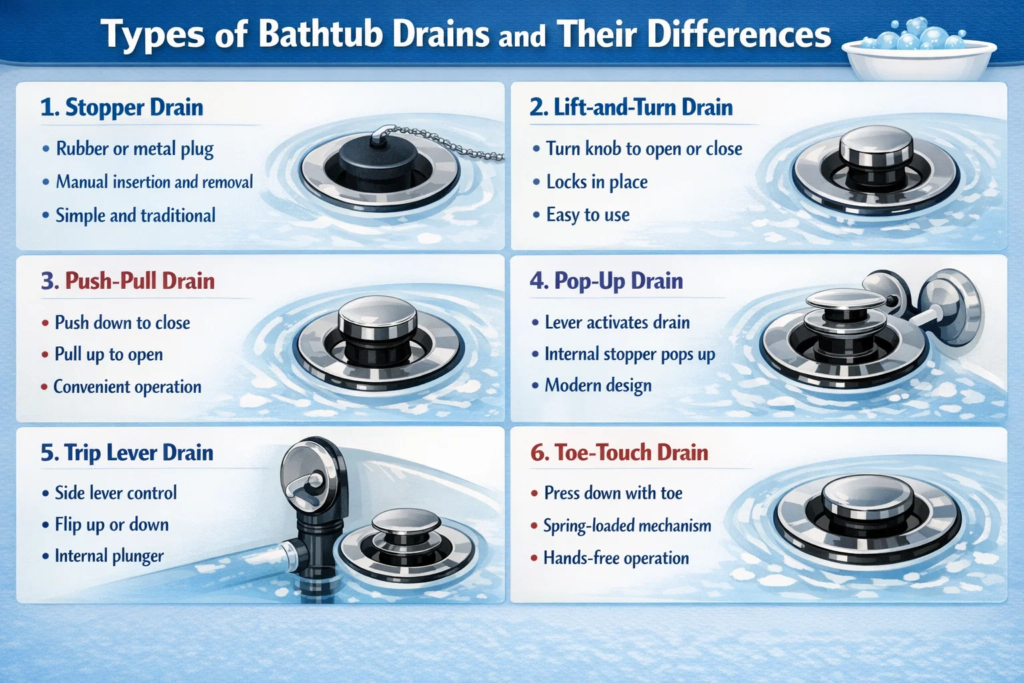
How to install a bathtub drain before beginning installation, it is important to identify the type of bathtub drain suitable for your tub. Common styles include toe-touch drains, lift-and-turn drains, trip-lever drains, and push-pull drains. Each design has a unique closing mechanism but shares a similar installation foundation. Selecting the wrong drain type can cause compatibility issues with your bathtub or overflow system. Material choice is equally important, with brass and stainless steel offering superior durability compared to plastic alternatives. Knowing your drain type ensures smoother installation and reduces the risk of improper fitting, which could otherwise compromise performance and longevity.
Tools and Materials Required Before You Begin
How to install a bathtub drain proper preparation sets the foundation for a successful installation. Essential tools typically include a drain wrench, adjustable pliers, plumber’s putty, silicone sealant, a screwdriver, and a clean cloth. You may also need a flashlight for visibility in tight spaces and a bucket to catch residual water. High-quality plumber’s putty is critical for creating a watertight seal between the drain flange and tub surface. Having all tools within reach minimizes interruptions and reduces errors. Carefully reading the manufacturer’s instructions for your specific drain model is strongly recommended before starting the installation process.
Safety Precautions to Follow During Installation
How to install a bathtub drain safety should never be overlooked when working with plumbing components. Always wear protective gloves to avoid cuts from sharp metal edges beneath the tub. Ensure the bathroom floor is dry to prevent slipping hazards. If you are working near electrical fixtures, confirm that nearby power sources are safely protected from water exposure. Avoid overtightening components, as excessive force can crack tubs or damage threads. Proper ventilation is also important when using sealants. How to install a bathtub drain following these precautions not only protects you physically but also helps prevent costly mistakes that could compromise the installation’s integrity.
Preparing the Bathtub for Drain Installation
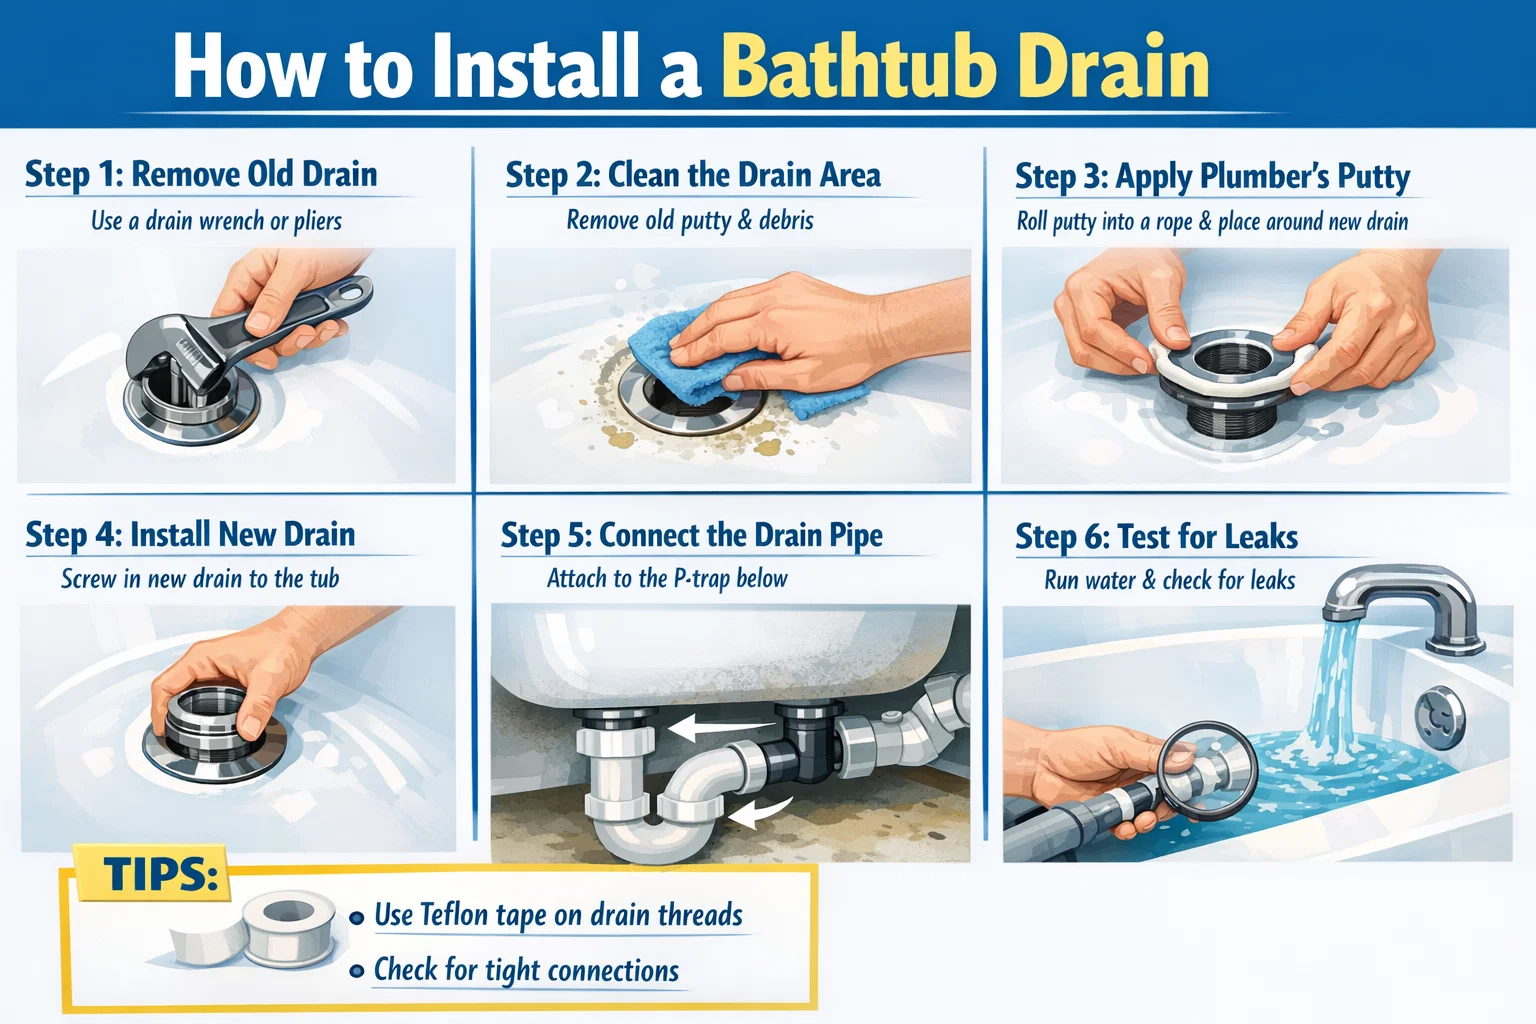
How to install a bathtub drain preparation begins with ensuring the tub opening is clean and free of debris. If replacing an old drain, remove it carefully using a drain wrench and clean away old putty or sealant residue. A clean surface ensures proper adhesion and sealing. Inspect the drain hole for cracks or corrosion, especially in older tubs. Dry the area thoroughly before applying new materials. This step is crucial because even small imperfections can lead to slow leaks. Taking time to prepare the bathtub properly reduces future maintenance issues and improves overall system reliability.
Installing the Drain Flange Correctly
How to install a bathtub drain the drain flange is the visible part of the drain that sits inside the tub opening. Apply a thick, even ring of plumber’s putty beneath the flange before inserting it into the drain hole. From below the tub, attach the drain body and tighten it securely using a drain wrench. Even pressure is essential to avoid misalignment or cracking. Excess putty should squeeze out around the flange and be wiped away cleanly. This step creates the primary watertight seal, making accuracy and patience especially important for long-term performance.
Connecting the Drain Body and Waste Shoe
How to install a bathtub drain. Once the flange is secured, the drain body connects to the waste shoe, which directs water toward the trap. Align these components carefully to ensure smooth water flow. Apply thread sealant or plumber’s tape to threaded connections for added leak protection. Tighten fittings firmly but avoid excessive force. Misaligned connections can cause slow drainage or leaks, which may not be immediately visible. Proper alignment at this stage ensures efficient water movement and reduces strain on downstream plumbing components.
Installing the Overflow Assembly
How to install a bathtub drain the overflow assembly prevents water from spilling over the tub edge by redirecting excess water into the drain system. Position the overflow gasket correctly between the tub wall and overflow plate. Secure the overflow pipe and connect it to the drain tee. Tighten screws evenly to maintain a watertight seal. Incorrect gasket placement is a common cause of hidden leaks, so double-check alignment before proceeding. A properly installed overflow system enhances safety and protects bathroom surfaces from water damage.
Sealing and Final Adjustments
After assembling all components, apply silicone sealant where recommended by the manufacturer. This extra layer of protection helps prevent moisture intrusion over time. Check that all fittings are aligned and secure. Remove any excess sealant for a clean finish. Allow the sealant to cure according to product instructions before testing. Rushing this step can compromise sealing effectiveness, so patience is essential. Final adjustments ensure that the entire system functions as a single, cohesive unit.

Testing the Bathtub Drain for Leaks
Testing is a critical step that should never be skipped. Fill the bathtub with several inches of water and observe all connections beneath the tub. Check for drips, moisture, or unusual sounds. Release the water and confirm that drainage is smooth and consistent. Even minor leaks should be addressed immediately to prevent long-term damage. Successful testing confirms that the installation is secure and ready for regular use, giving you confidence in your work.
Common Mistakes to Avoid During Installation
Many installation issues result from avoidable errors. Using too little plumber’s putty can cause leaks, while overtightening can crack fittings. Ignoring manufacturer instructions often leads to compatibility problems. Failing to test the system thoroughly may allow small leaks to go unnoticed. Precision and patience are key to avoiding these mistakes. Taking time to review each step before moving forward ensures a professional-quality result, even for first-time installers.
Maintenance Tips for Long-Term Performance
Proper maintenance extends the life of your bathtub drain and prevents future issues. Periodically inspect visible components for corrosion or looseness. Avoid harsh chemical cleaners that can damage seals and metal parts. Use drain strainers to reduce hair buildup. Routine care reduces clogs and protects seals, ensuring consistent performance. A well-maintained drain not only functions better but also contributes to a cleaner, healthier bathroom environment.
Conclusion
Understanding how to install a bathtub drain empowers homeowners to take control of essential bathroom maintenance with confidence. While the process requires attention to detail, each step becomes manageable with proper preparation and careful execution. From selecting the right drain type to sealing and testing the final assembly, every action contributes to long-term performance and leak prevention. By following this comprehensive guide, you can achieve a professional-quality installation that enhances your bathroom’s functionality and durability. A correctly installed drain protects your home, saves money, and delivers lasting peace of mind.
Frequently Asked Questions
1. Can a beginner install a bathtub drain without professional help?
Yes, with proper tools, instructions, and patience, most homeowners can complete the installation successfully.
2. How long does installation usually take?
Most installations take one to two hours, depending on experience and tub accessibility.
3. Is plumber’s putty always necessary?
In most cases, yes, as it creates a reliable watertight seal beneath the drain flange.
4. What causes bathtub drain leaks after installation?
Common causes include misaligned components, insufficient sealing, or overtightened fittings.
5. Should I replace the overflow gasket during installation?
Yes, replacing it ensures a proper seal and reduces the risk of hidden leaks.
6. How often should a bathtub drain be inspected?
A visual inspection every six to twelve months helps catch early signs of wear or leaks.
For More Update and Stories Visit Daily Guides