Installing a kitchen waste disposal unit may sound intimidating, but with the right preparation and guidance, it can be a rewarding and practical DIY project. Learning how to install a garburator not only saves money on professional services but also gives you greater control over your kitchen’s functionality. A properly installed unit helps manage food waste efficiently, reduces unpleasant odors, and supports cleaner plumbing over time.
This guide is designed for homeowners who want clear, reliable, and up-to-date instructions without unnecessary jargon. From understanding essential tools to testing the finished system, every step is explained in detail. Whether you are replacing an old unit or installing one for the first time, this article will walk you through the entire process safely and confidently.
Understanding What a Garburator Does in Your Kitchen
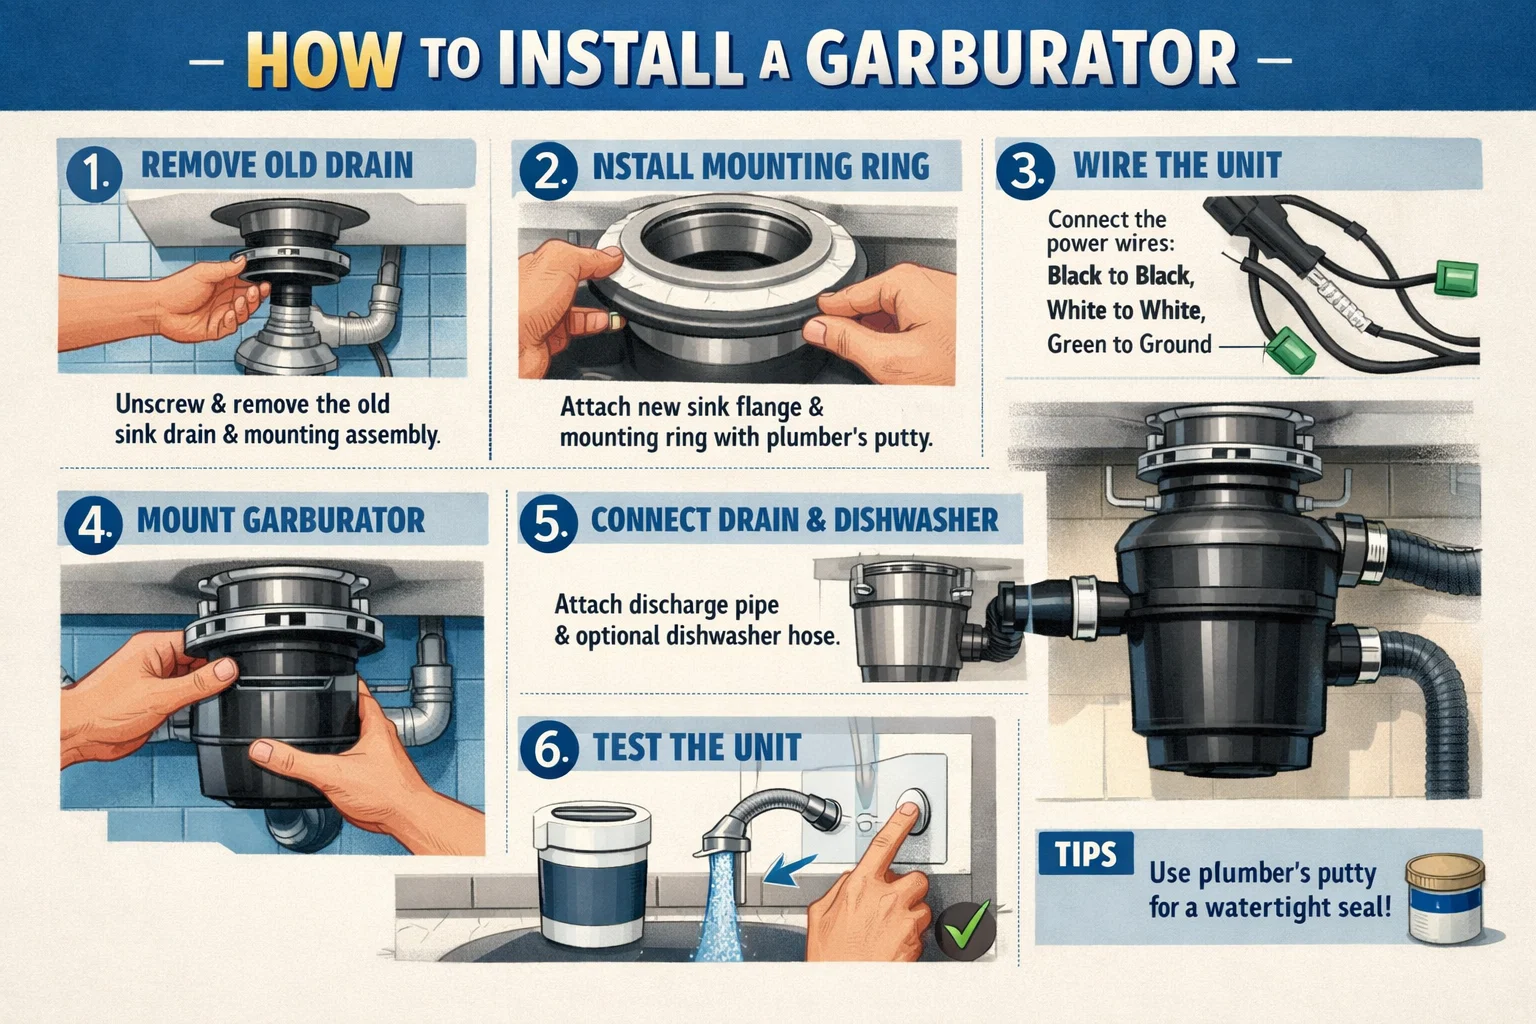
How to install a garburator. A garburator, also known as a food waste disposer, is installed beneath the kitchen sink and connects directly to the drain. Its primary role is to grind food scraps into small particles that safely pass through plumbing lines. This appliance helps reduce the amount of organic waste sent to landfills and keeps your kitchen cleaner. Modern units are quieter, more energy-efficient, and built with corrosion-resistant materials. Understanding how the system functions before installation helps prevent common mistakes. The unit uses a spinning impeller plate, not sharp blades, to break down waste. Water flow is essential during operation, ensuring smooth movement through pipes and preventing buildup. Proper installation ensures optimal performance and long-term reliability.
Tools and Materials You Will Need Before You Begin
Preparation is key to a smooth installation experience. Having the correct tools and materials ready prevents unnecessary interruptions. You will typically need a screwdriver, adjustable wrench, plumber’s putty, wire connectors, a bucket, and safety gloves. If replacing an existing unit, keep towels nearby to manage residual water. Most new disposers come with mounting hardware and a user manual specific to the model. How to install a garburator. Reading the manufacturer’s instructions beforehand is strongly recommended. You may also require an electrical cord if the unit is not pre-wired. Ensuring compatibility with your sink, drain size, and power supply avoids last-minute complications. Taking time to prepare creates a safer and more efficient working environment.
Safety Precautions to Follow During Installation
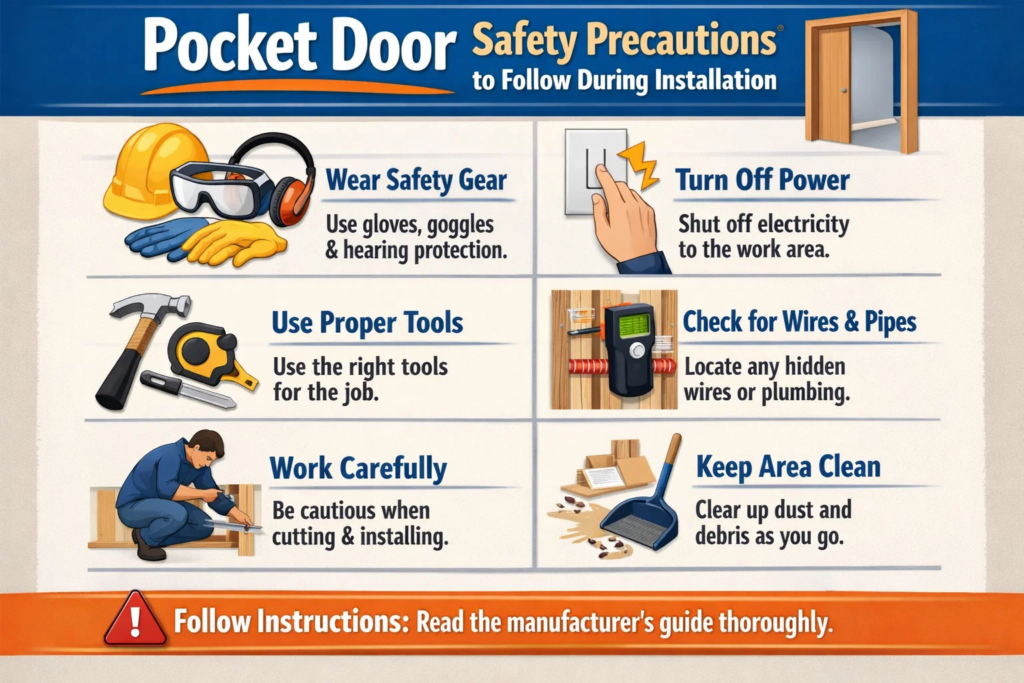
How to install a garburator. Safety should always be the first priority when working with plumbing and electrical components. Before starting, turn off the power supply at the circuit breaker to prevent electric shock. Shut off the water supply to avoid leaks or accidental flooding. Wearing protective gloves helps prevent cuts from metal edges under the sink. Never place your hands inside the disposal chamber, even when the unit is unplugged. Keep children and pets away from the workspace during installation. Proper lighting under the sink improves visibility and reduces the risk of mistakes. How to install a garburator. Following these safety steps ensures the installation process remains controlled, secure, and stress-free from start to finish.
Preparing the Sink and Drain Assembly
Before mounting the new unit, the sink opening must be properly prepared. If replacing an old disposer, carefully disconnect it from the mounting ring and drain pipe. Remove any old plumber’s putty or gasket residue to ensure a tight seal. How to install a garburator for first-time installations, you will need to install the sink flange. Apply a generous ring of plumber’s putty around the flange before inserting it into the sink opening. From below, secure it with the provided mounting hardware. Tightening evenly is essential to prevent leaks. This preparation stage forms the foundation of the entire system, making accuracy and patience especially important.
Mounting the Garburator Unit Correctly
How to install a garburator. Once the sink flange is secured, the next step is attaching the disposer unit. Lift the unit carefully and align it with the mounting ring. Most systems use a twist-and-lock mechanism that secures the unit in place. Support the weight of the disposer while rotating it until it locks firmly. Ensuring a stable mount reduces vibration and noise during operation. At this stage, double-check that all components are aligned properly. A poorly mounted unit can lead to leaks or premature wear. Taking extra time here ensures long-term performance and minimizes future maintenance issues.
Connecting the Drain and Dishwasher Line
How to install a garburator. After mounting, connect the drain pipe to the disposer’s outlet. Use a rubber gasket and metal clamp to ensure a watertight seal. If your kitchen includes a dishwasher, you will need to connect its drain hose to the disposer’s inlet. Remember to remove the knockout plug inside the inlet before attaching the hose. Failing to do so can cause dishwasher backups. Tighten all connections securely, but avoid overtightening, which may crack plastic components. How to install a garburator proper drainage connections ensure smooth waste flow and prevent leaks under the sink, which can otherwise go unnoticed for long periods.
Electrical Connections and Power Setup
How to install a garburator. Electrical setup varies depending on whether the unit is hardwired or uses a plug-in cord. Always confirm that the power remains off before handling wires. For plug-in models, simply connect the cord to the unit following the manufacturer’s wiring diagram. Hardwired installations require connecting matching wires with approved connectors and securing the cover plate. Ensure proper grounding, as this protects both the appliance and the user. Once connected, neatly organize wires to keep them away from moisture. Electrical safety at this stage is critical, as improper wiring can damage the unit or pose serious hazards.
Testing the Installation for Leaks and Performance
How to install a garburator before declaring the job complete, thorough testing is essential. Restore the water supply and inspect all connections for leaks. Tighten fittings if necessary. Next, restore power and run cold water through the sink. Turn on the disposer and listen for unusual sounds. A smooth, steady hum indicates correct installation. Drop small food scraps into the unit to confirm proper grinding and drainage. Never test with large or hard items initially. Successful testing ensures that the system operates efficiently and safely, giving you confidence in your work and peace of mind for daily use.
Common Installation Mistakes and How to Avoid Them
How to install a garburator many installation problems stem from small oversights. One common mistake is forgetting to remove the dishwasher knockout plug. Another is uneven tightening of the sink flange, which causes leaks. Incorrect electrical connections can prevent the unit from starting altogether. Using hot water during testing is also a frequent error, as cold water is required to solidify grease for proper disposal. Rushing through steps often leads to missed details. By following instructions carefully and reviewing each stage before moving on, these issues can be easily avoided. Attention to detail is the key to a trouble-free installation.
Maintenance Tips for Long-Term Performance
How to install a garburator proper maintenance extends the life of your disposer and keeps it running efficiently. Always run cold water before, during, and after use to flush debris through the system. Avoid disposing of fibrous foods, grease, or large bones. Periodically clean the unit using ice cubes and citrus peels to remove buildup and odors. Regular inspections under the sink help detect leaks early. How to install a garburator a well-maintained unit operates quietly, efficiently, and reliably. Consistent care reduces repair costs and ensures your kitchen remains hygienic and functional for years to come.
Conclusion
Learning how to install a garburator empowers homeowners to take control of their kitchen upgrades with confidence. While the process involves multiple steps, each stage becomes manageable with careful preparation and attention to detail. From mounting the unit securely to ensuring safe electrical connections, every action contributes to long-term performance. Proper testing and maintenance further protect your investment. By following this comprehensive guide, you not only save on installation costs but also gain valuable home improvement skills. A correctly installed garburator enhances kitchen efficiency, supports cleaner waste management, and adds practical value to your home.
Frequently Asked Questions
1. Can a beginner install a garburator without professional help?
Yes, most homeowners can complete the installation by carefully following instructions and safety guidelines.
2. How long does installation usually take?
For most setups, the process takes one to two hours, depending on experience and sink configuration.
3. Do all sinks support a food waste disposer?
Most standard kitchen sinks do, but compatibility with drain size and cabinet space should be checked first.
4. Is special wiring required for installation?
Some models require hardwiring, while others use a plug-in cord. Always follow manufacturer instructions.
5. What should never go into the unit?
Avoid grease, fibrous vegetables, eggshells, and non-food items to prevent clogs and damage.
6. How often should the disposer be cleaned?
Light cleaning every few weeks helps maintain performance and prevent odors.
For More Update and Stories Visit Daily Guides