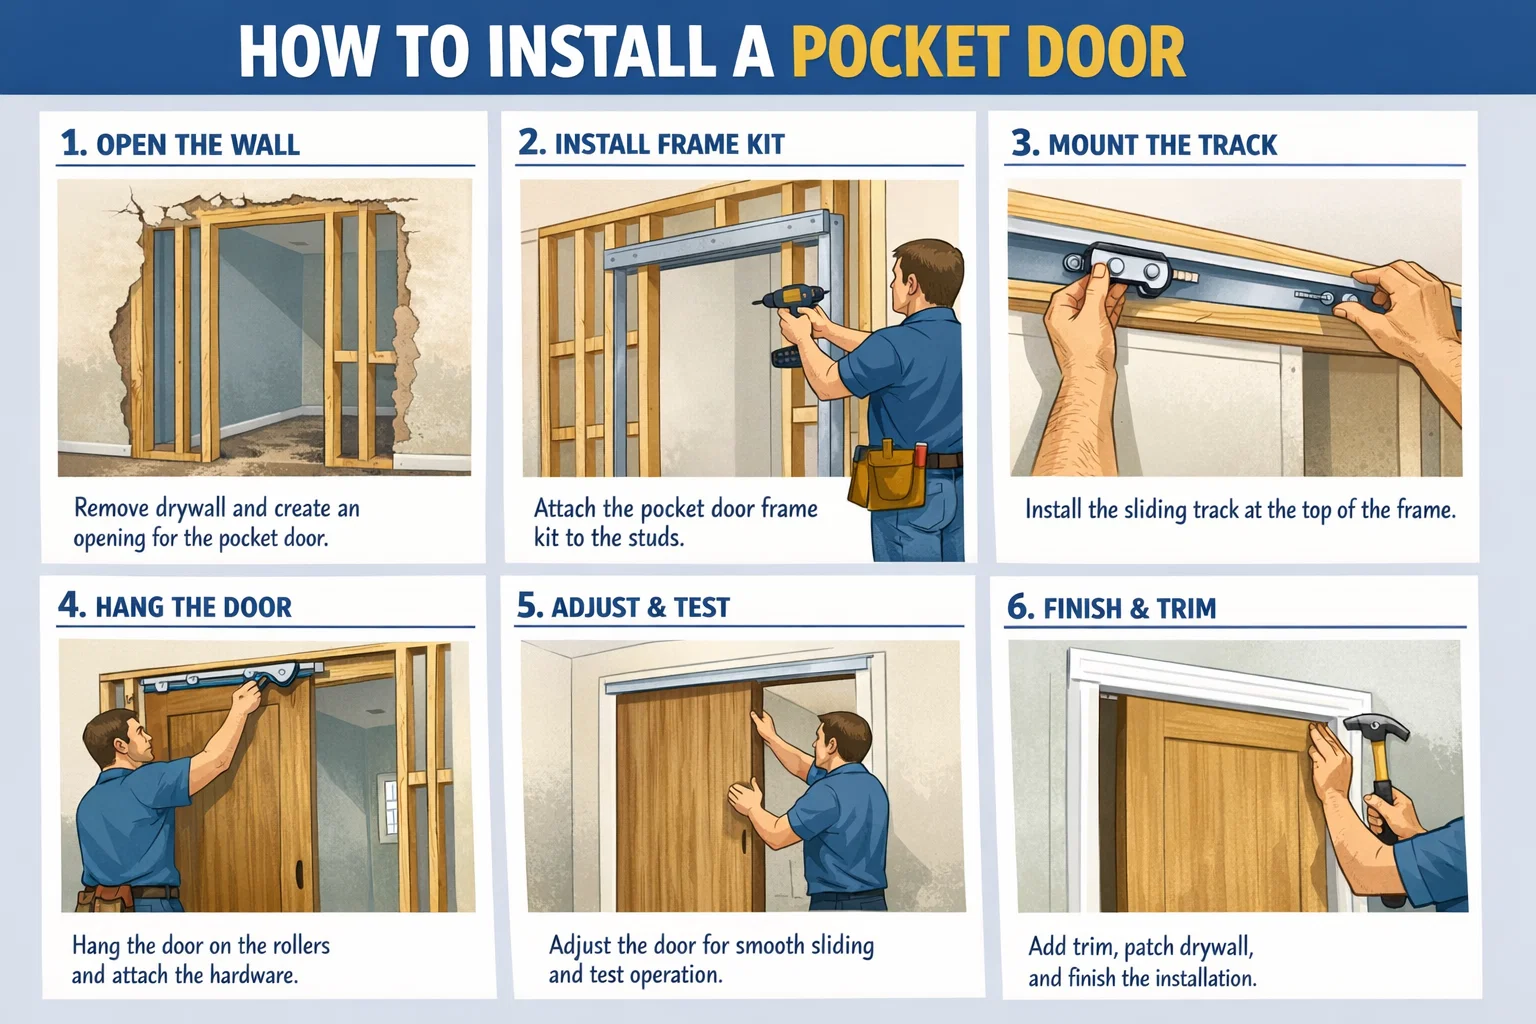
Learning how to install a pocket door can feel intimidating at first, especially if you have never opened a wall before. However, with careful planning, the right tools, and a clear understanding of each step, this project becomes manageable even for dedicated DIY homeowners. Pocket doors slide neatly into the wall cavity, saving valuable floor space while adding a clean, modern look. They are especially popular in bathrooms, closets, and small rooms where swinging doors feel restrictive. This guide explains the entire process in a clear and structured way, combining practical experience with technical accuracy. By the end, you will understand not just what to do, but why each step matters.
What Is a Pocket Door and Why Choose It
A pocket door is a sliding door that disappears into a framed cavity inside the wall when opened. Unlike traditional hinged doors, it does not require clearance space, making it ideal for compact layouts. Homeowners often choose pocket doors to improve accessibility, enhance room flow, and achieve a minimalist appearance. How to install a pocket door, Modern hardware systems have significantly improved durability and smooth operation compared to older designs. When installed correctly, these doors can last for decades without issues. Understanding the mechanics behind pocket doors helps you appreciate why precise framing and alignment are critical. This foundational knowledge sets the stage for a successful installation from start to finish.
Planning Before You Begin Installation
Before starting how to install a pocket door, careful planning is essential. First, confirm that the wall is non-load-bearing, as modifying a structural wall requires professional engineering approval. Next, check for electrical wiring, plumbing pipes, or HVAC lines inside the wall cavity. Relocating these systems can dramatically increase project complexity and cost. Measure the rough opening accurately, accounting for door width, height, and track system requirements. Decide whether you are installing a single or double pocket door, as framing dimensions differ. Good planning reduces surprises, prevents costly mistakes, and ensures the finished door operates smoothly and quietly.
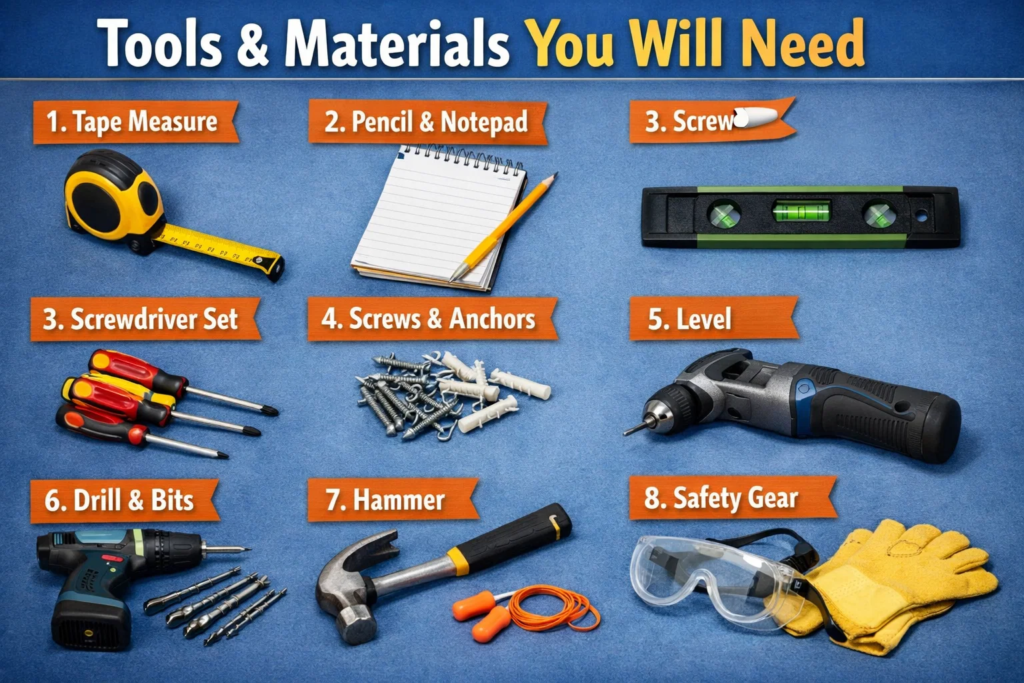
Tools and Materials You Will Need
How to install a pocket door, Having the correct tools and materials ready before demolition saves time and frustration. Essential tools include a tape measure, level, reciprocating saw, hammer, drill, and screwdrivers. You will also need safety gear such as gloves, eye protection, and a dust mask. Materials typically include a pocket door frame kit, door slab, track hardware, drywall, joint compound, and finishing trim. Choosing a high-quality frame kit is especially important because it determines door alignment and long-term performance. Organizing everything in advance helps maintain workflow and minimizes interruptions during installation.
Removing the Existing Door and Wall Section
The first physical step in how to install a pocket door involves removing the existing hinged door and opening the wall. Start by taking off the door slab, hinges, and trim carefully to avoid damaging reusable materials. Next, cut the drywall on one side of the wall to expose the studs. It is usually best to remove drywall completely from floor to ceiling in the pocket area for easier access. Work slowly and check behind the wall for wires or pipes before cutting deeper. Clean removal creates a safer workspace and makes framing adjustments much easier and more accurate.
Framing the Wall for a Pocket Door
How to install a pocket door, Framing is the backbone of a successful pocket door installation. Remove the existing studs within the pocket area and replace them with the vertical steel or wood studs provided in your frame kit. Install a new header beam above the opening to support the wall structure. Use a level to ensure everything is perfectly plumb and square. Even minor misalignment can cause the door to rub or stick later. Secure the frame firmly to the floor and header, following manufacturer spacing guidelines. Proper framing ensures smooth door movement and prevents drywall cracking over time.
Installing the Pocket Door Track System
How to install a pocket door, The track system allows the door to glide smoothly into the wall cavity. Carefully mount the track to the header using the supplied hardware, ensuring it is perfectly level from end to end. This step is critical because an uneven track will cause the door to slide open or closed on its own. Attach the roller assemblies according to the instructions, checking that they move freely without resistance. Test the track before hanging the door by sliding the rollers back and forth. Precision during this stage directly affects the door’s performance and long-term reliability.
Hanging the Door Slab Correctly
How to install a pocket door, Once the track is secure, it is time to hang the door slab. Attach the roller hangers to the top of the door, following the spacing guidelines provided by the manufacturer. Lift the door carefully and hook the rollers onto the track. Adjust the height so the door hangs evenly and clears the floor by the recommended distance. Slide the door fully into the pocket to ensure it moves smoothly without scraping. This stage often requires patience and fine adjustments. Proper hanging is central to mastering how to install a pocket door that operates effortlessly.
Adjusting Alignment and Door Movement
How to install a pocket door, After hanging the door, fine-tuning alignment is essential. Use the adjustment screws on the roller hangers to correct any tilt or uneven gaps. Check that the door remains vertical throughout its entire travel path. Open and close it several times to confirm smooth operation and consistent clearance. Listen for scraping sounds or resistance, which indicate alignment issues. Small adjustments now prevent larger problems later. This step may seem minor, but it greatly affects user experience. A well-adjusted door feels solid, quiet, and professional, enhancing the overall quality of the installation.
Installing Drywall Around the Pocket Frame
How to install a pocket door, Drywall installation around a pocket door requires extra care. Use shorter drywall screws to avoid penetrating the pocket cavity, which could obstruct door movement. Apply drywall sheets evenly, maintaining proper spacing at seams. After securing the drywall, apply joint compound in thin layers, allowing adequate drying time between coats. Sand lightly for a smooth finish before painting. This stage restores the wall’s appearance and hides the internal mechanism. Attention to detail here ensures the wall looks seamless while preserving the door’s functionality. Proper drywall work completes the structural phase of installation.
Adding Door Jambs and Trim
How to install a pocket door, With the wall finished, install the door jambs and trim to complete the opening. Pocket door kits often include split jambs designed to accommodate wall thickness variations. Fit these carefully to ensure a clean, tight appearance. Attach casing trim around the opening using finish nails, checking alignment frequently. Choose trim styles that complement your interior design for a cohesive look. This finishing step transforms the project from a construction zone into a polished feature. Clean lines and precise cuts enhance the door’s visual appeal and increase perceived craftsmanship.
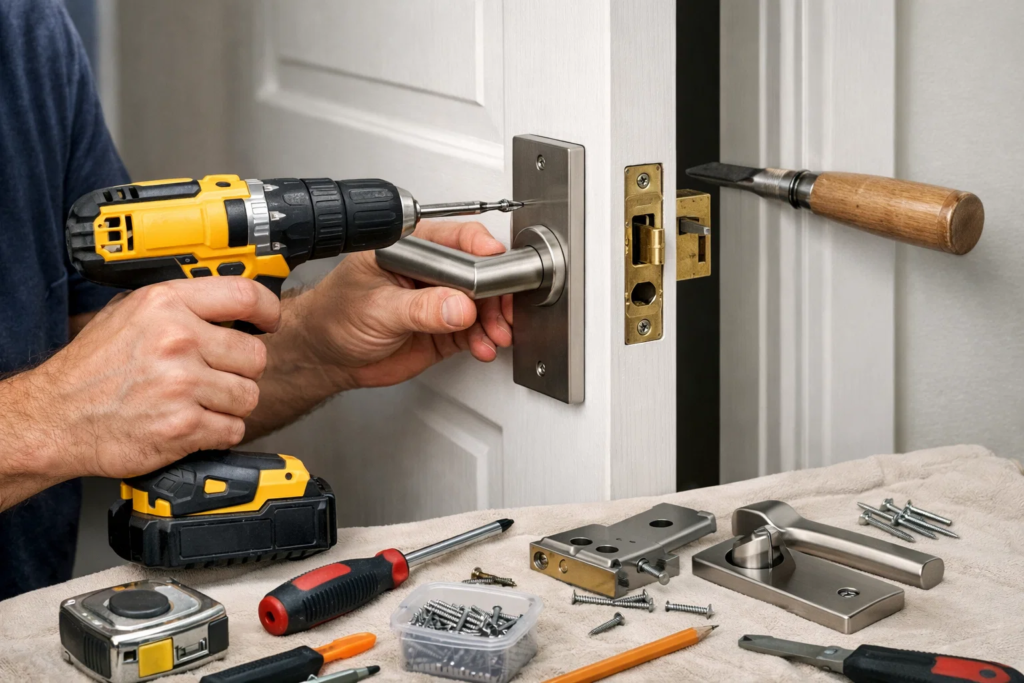
Installing Door Hardware and Handles
How to install a pocket door, Pocket doors require specialized recessed handles to allow full retraction into the wall. Install these handles according to manufacturer instructions, ensuring they sit flush with the door surface. If your door includes a privacy lock, test its operation before final tightening. Proper hardware installation improves usability and safety, especially in bathrooms and bedrooms. Align handles carefully to maintain symmetry and comfort. This stage is often overlooked, but quality hardware contributes significantly to the overall feel of the door. Thoughtful installation here adds both function and elegance.
Common Mistakes to Avoid During Installation
How to install a pocket door, Understanding common mistakes helps you avoid costly repairs later. One frequent error is failing to verify wall structure before demolition. Another is improper leveling of the track, which leads to sliding issues. Using incorrect drywall screws can puncture the pocket cavity and obstruct door movement. Rushing alignment adjustments often results in uneven gaps or sticking doors. Skipping manufacturer instructions is another critical mistake, as each system has specific requirements. By avoiding these pitfalls, you ensure your efforts in how to install a pocket door lead to a durable and professional result.
Maintenance Tips for Long-Term Performance
How to install a pocket door, Once installed, pocket doors require minimal maintenance when done correctly. Keep the track clean by occasionally vacuuming dust from the opening. Avoid slamming the door, as repeated impact can loosen hardware over time. Periodically check roller adjustments if the door begins to drift. Lubrication is rarely needed for modern systems, but follow manufacturer recommendations if issues arise. Proper care extends the lifespan of the door and preserves smooth operation. Maintenance awareness ensures your investment continues to perform quietly and reliably for years.
When to Consider Professional Help
How to install a pocket door, While many homeowners successfully complete this project, certain situations call for professional assistance. Load-bearing walls, complex plumbing reroutes, or custom double-door installations may exceed typical DIY skill levels. If measurements are inconsistent or alignment problems persist, expert help can prevent further damage. Hiring a professional also saves time and ensures code compliance. Knowing when to seek help is part of understanding how to install a pocket door responsibly. A balanced approach protects both your home and your budget.
Conclusion
Installing a pocket door is a rewarding project that enhances both function and style when done correctly. By following each step carefully, from planning and framing to finishing and maintenance, you can achieve professional-quality results. This guide has shown that learning how to install a pocket door is not about rushing through steps, but about understanding structure, precision, and patience. With the right preparation and attention to detail, a pocket door becomes a long-lasting upgrade that improves space efficiency and interior flow. The effort invested pays off every time the door glides smoothly into place.
Frequently Asked Questions
1. Is installing a pocket door harder than a regular door?
Installing a pocket door is more complex because it involves opening a wall and precise framing. However, with clear instructions and patience, many homeowners complete it successfully.
2. Can a pocket door be installed in any wall?
Pocket doors work best in non-load-bearing walls without plumbing or wiring. Structural walls require professional evaluation before modification.
3. How long does installation usually take?
Most DIY installations take two to three days, including drywall finishing and drying time. Professional installers may complete it faster.
4. Are pocket doors durable for daily use?
Modern pocket door systems are designed for daily use and can last many years when installed and maintained properly.
5. Do pocket doors provide enough privacy?
Yes, when fitted with proper hardware and alignment, pocket doors offer privacy comparable to traditional doors.
6. Can I install a pocket door in an existing bathroom?
Yes, bathrooms are common locations, but ensure moisture-resistant materials and proper ventilation are used.
7. What is the biggest challenge during installation?
Achieving perfect alignment and a level track is the most challenging part, as small errors can affect door movement.
For More Update and Stories Visit Daily Guides